
Upgrading OpenJDK
Introduction
The OpenJDK component installed with Cloudpaging Server can be updated to the latest patch version available. For example, if Cloudpaging Server installs with jdk8u342-b07.1, it can be upgraded to the latest stable patch that has been released for the OpenJDK major version 8 e.g. jdk8u372-b07.
When upgrading, OpenJDK must be manually installed and configured on all servers running Cloudpaging Server. This article provides the steps to upgrade.
Customers can complete this process internally.
It is recommended to upgrade Cloudpaging Server before upgrading OpenJDK as that version will be compatible with the newer versions of OpenJDK.
AppsAnywhere Support can only apply this to the Latest Release of Cloudpaging Server.
Obtain OpenJDK community build
A build of OpenJDK be downloaded from Latest Releases | Adoptium.
Ensure the OpenJDK build number is the same as the version compatible with the release of Cloudpaging Server.
Install OpenJDK
The OpenJDK upgrade should be performed on one server at a time to prevent service interruption.
OpenJDK must be manually installed and configured to all servers running Cloudpaging Server. Follow the steps below to install OpenJDK using an installer.
Run the downloaded installer.
Accept the EULA
Install OpenJDK Runtime. OpenJFX Runtime and Web Start are not needed for Cloudpaging Server. If you change the install location, then make sure to note it as you will need it in the later step.

Continue by clicking on Next, then Install. Finally, complete the install by clicking on Finish.
Update Cloudpaging Server
Once OpenJDK has been installed, Cloudpaging Server configuration must be updated to use the installed OpenJDK instead of OracleJDK provided with the Cloudpaging Server installer.
There is a registry script attached to this article to update the configuration automatically if you installed the OpenJDK 1.8.0.191 using the link provided above, and installed to the default location. Otherwise, follow the steps below to update the JVM configurations.
Important: The following steps require you to modify the Windows registry. Make sure that you back up the registry before you modify it. Make sure that you know how to restore the registry if a problem occurs.
Open Registry Editor and navigate to the following path:
64-bit OS: HKEY_LOCAL_MACHINE\SOFTWARE\WOW6432Node\Apache Software Foundation\Procrun 2.0\JukeboxServer\Parameters\Java32-bit OS: HKEY_LOCAL_MACHINE\SOFTWARE\Apache Software Foundation\Procrun 2.0\JukeboxServer\Parameters\Java
Edit the following registry value:
Name: JVMType: REG_SZData: <path to the OpenJDK install location>\jre\bin\server\jvm.dll(example: C:\Program Files (x86)\ojdkbuild\java-1.8.0-openjdk-1.8.0.191-1\jre\bin\server\jvm.dll)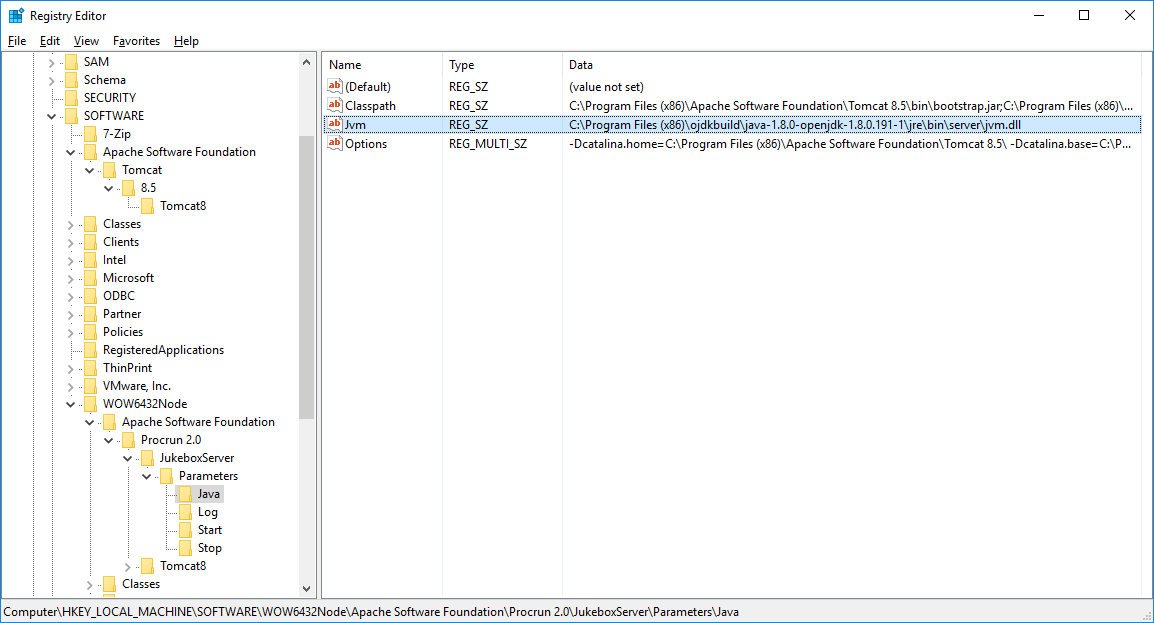
Then, navigate to the following path:
64-bit OS: HKEY_LOCAL_MACHINE\SOFTWARE\WOW6432Node\Apache Software Foundation\Procrun 2.0\JukeboxServer\Parameters\Start32-bit OS: HKEY_LOCAL_MACHINE\SOFTWARE\Apache Software Foundation\Procrun 2.0\JukeboxServer\Parameters\Start
Edit the following registry value:
Name: WorkingPathType: REG_SZData: <path to the OpenJDK install location >\jre\bin(example: C:\Program Files (x86)\ojdkbuild\java-1.8.0-openjdk-1.8.0.191-1\jre\bin)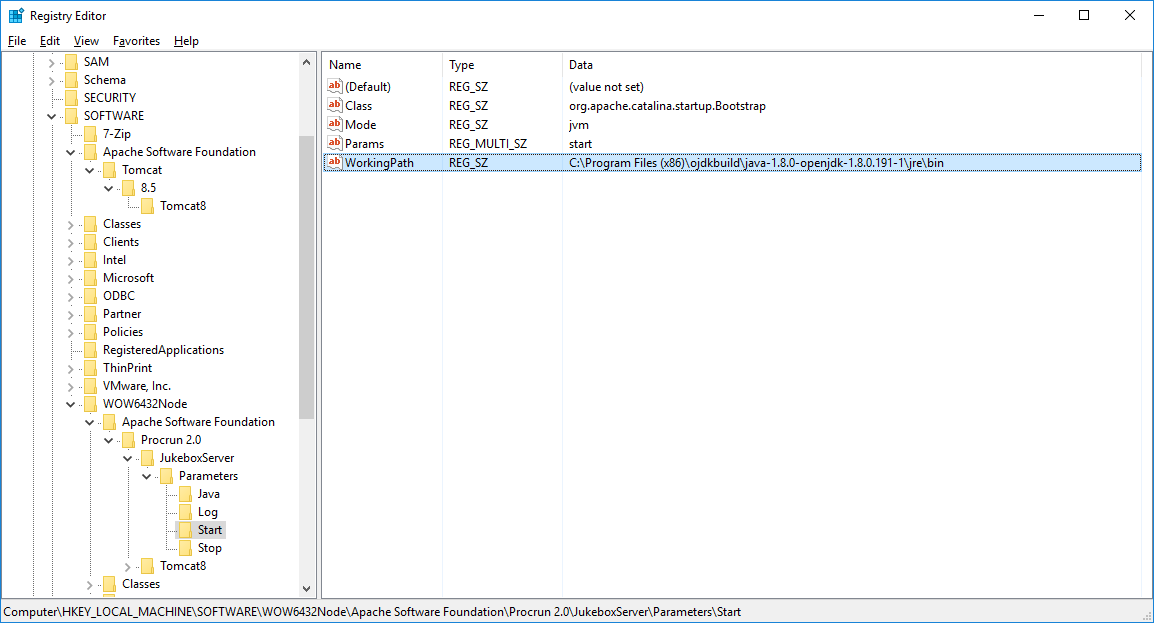
Restart Cloudpaging Server by using Services MMC
Verification
Open C:\Program Files (x86)\Numecent\Application Jukebox Server\core\logs
Check the following lines log the new version:
Configuration: java.runtime.version: <OpenJDK version>e.g. 1.8.0_191-1-ojdkbuild-b12Configuration: java.home: <path to the OpenJDK install location>\jree.g. C:\Program Files (x86)\ojdkbuild\java-1.8.0-openjdk-1.8.0.191-1\jre)
Remove previous versions of Java will need to be removed manually.
Check that https://localhost/jukeboxserver allows login
Check that local services are running.
Complete the update on the remaining Cloudpaging Servers.