
Upgrading Tomcat to a newer patch version
Introduction
The Apache Tomcat component installed with Cloudpaging Server can be updated to the latest patch version available. For example, if Cloudpaging Server installs with Tomcat version 8.5.1, it can be upgraded to patch versions 8.5.x for the latest stable patch that Apache has released for version 8.5.
When upgrading, Tomcat must be manually installed and configured on all servers running Cloudpaging Server. This article provides the steps to upgrade from Tomcat 8.5.42 to Tomcat 8.5.55 as an example. Please substitute the versions with the ones upgrading from and to.
The steps on this article, only apply to Cloudpaging Server 9.2 and above.
Customers can complete this process internally.
It is recommended to upgrade Cloudpaging Server before upgrading Tomcat as that version will be compatible with the newer versions (e.g. 9.0) of Tomcat.
AppsAnywhere Support can only apply this to the Latest Release of Cloudpaging Server.
Obtaining the latest Tomcat Installer
The Tomcat installer can be downloaded from the Apache Tomcat site at https://tomcat.apache.org under the download section, install the 32-bit/64-bit Windows Service installer.
Please validate the hash when downloading the installer.
Removing the Tomcat8 service
The Tomcat upgrade should be performed on one server at a time to prevent service interruption.
First, remove the default Tomcat service so it does not conflict with the service installed during the newer Tomcat installation.
Open an elevated command prompt.
Depending on your version, navigate to the Tomcat8.exe directory:
CODEcd "C:\Program Files (x86)\Apache Software Foundation\tomcat-8.5.XX\bin\"Enter the following command to remove the Tomcat service:
CODETomcat8.exe //DS//Tomcat8Open services.msc and verify the default Apache Tomcat8 service is no longer present.
Close the command prompt.
The default Tomcat service is installed during the tomcat installation. If a pre-existing Tomcat service is installed then the new Tomcat service cannot be installed and the install will fail, therefore the service needs to be uninstalled before running the installer. Cloudpaging Server does not use this service and it can safely be removed if not used elsewhere.
Installing Tomcat 8.5.x
Follow the steps below to install Tomcat using the installer.
Run the downloaded installer
Accept the EULA
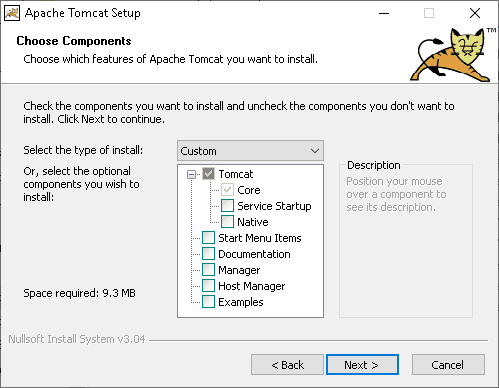
At the Choose Components screen, Uncheck everything but the Tomcat Core component as in the screenshot below
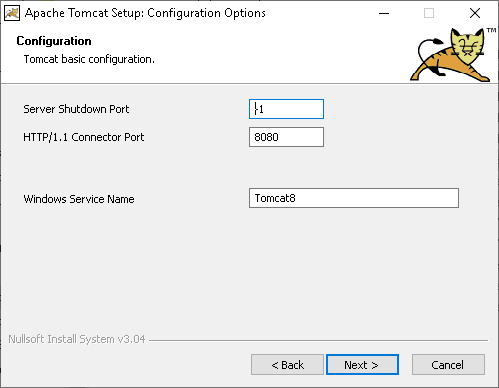
Keep the default values and click Next > at the Configuration screen.
At the Java Virtual Machine screen, enter the following path:
If on Cloudpaging 9.4.X and below, the file path will look something like this:
C:\Program Files (x86)\AdoptOpenJDK\jre-8.0.202.08If on Cloudpaging 9.5.X and above, the file path will look something like this:
C:\Program Files (x86)\Eclipse Foundation\jre-8.0.302.8-hotspot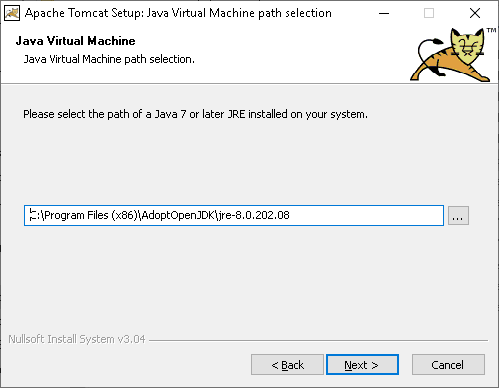
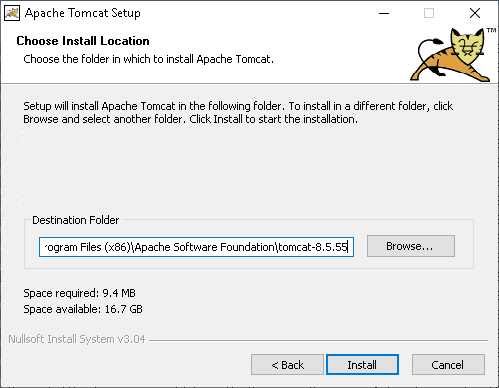
When asked to choose the install location, enter C:\Program Files (x86)\Apache Software Foundation\tomcat-8.5.XX and click Install:
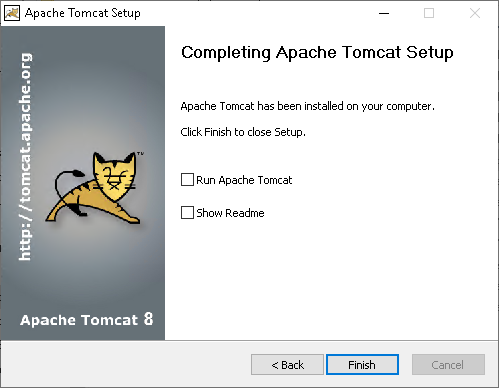
At the Completing Apache Tomcat Setup screen, uncheck Run Apache Tomcat and click Finish
Updating the Cloudpaging Server Configuration
Once Tomcat 8.5.x has been installed, the Cloudpaging Server configuration must be updated to use the new Tomcat version.
Open the Registry Editor (regedit.exe) and navigate to the following registry key:
HKEY_LOCAL_MACHINE\SOFTWARE\WOW6432Node\Apache Software Foundation\Procrun 2.0\JukeboxServer\Parameters\JavaEdit the following registry value:
Value Name:
ClasspathValue Type:
REG_SZValue Data: Modify any mentions of the path for the Tomcat install to reflect the new path.
(Example: C:\Program Files (x86)\Apache Software Foundation\tomcat-8.5.55\bin\bootstrap.jar;C:\Program Files (x86)\Apache Software Foundation\tomcat-8.5.55\bin\tomcat-juli.jar;C:\Program Files (x86)\Numecent\Application Jukebox Server\mssql-jdbc-7.2.1.jre8.jar)Note: Classpath contains two path mentions for Tomcat

Edit the following registry value:
Value Name:
OptionsValue Type:
REG_MULTI_SZValue Data: Modify the -Dcatalina.home line to reflect the new Tomcat install path
(Example: Dcatalina.home=C:\Program Files (x86)\Apache Software Foundation\tomcat-8.5.55\)
Then, navigate to the following registry key and edit the value below: HKEY_LOCAL_MACHINE\SYSTEM\CurrentControlSet\Services\JukeboxServer
Value Name:
ImagePathValue Type:
REG_EXPAND_SZValue Data: Modify the path to Tomcat to reflect the new location
(Example: "C:\Program Files (x86)\Apache Software Foundation\tomcat-8.5.55\bin\tomcat8.exe" //RS//JukeboxServer)
Restart Cloudpaging Server by using the Services MMC
Verification
Open C:\Program Files (x86)\Numecent\Application Jukebox Server\core\logs
Check the following line logs the new version:
Configuration: catalina.home: C:\Program Files (x86)\Apache Software Foundation\tomcat-<version>e.g. 8.5.55
Check that https://localhost/jukeboxserver allows login
Check that local services are running.
Remove the old Tomcat install directory e.g. C:\Program Files (x86)\Apache Software Foundation\tomcat-8.5.42
Remove the default ....webapps\ROOT subfolder e.g. C:\Program Files (x86)\Apache Software Foundation\tomcat-8.5.55\webapps\ROOT)
Complete the update on the remaining Cloudpaging Servers.