
Creating a provision
Overview
Providing users with access to resources in AppsAnywhere is done by including them in a provision. In this article, we'll walk through everything you need to know about creating a provision.
You will need to create a provision in AppsAnywhere to allow your users with access to the resources you have created. There are two core parts to a provision:
The directory entity you wish to provide access to
The resources to which they will have access
You can define multiple directory entries and multiple resources in the same provision if you want and there are more settings available to help you define exactly how that access works, but we'll go through all of that in detail in this article.
Choosing a Strategy
Often the hardest part about setting up provisions is deciding on a strategy on how you will structure and manage everything in AppsAnywhere.
There are certainly a lot of options you could choose, here are a few suggestions:
Create a provision for each resource and link it to every directory record (user/group/machine etc) that you want to be able to access it
Create a provision for each resource and link it to a directory group made especially to represent access to that resource (allowing you to manage access through directory assignments, as opposed to changes in AppsAnywhere)
Create a provision for each group of users and link it to every application that they have access to
Employ a mixed strategy and group resources and directory records in a way that best represents the structure of your organization and how you operate
The last options is always the one we would recommend, but it does take a little more thought and planning! Here's an example:
You create a provision named "Engineering Apps" which links three AD groups; "Engineering Students - Year 1", "Engineering Students - Year 2" and "Engineering Staff" to all the apps specific to Engineering (such as Autocad, MATLAB, etc).
You create another provision named "Open Source Apps" which links a single AD group; "Domain Users" to all of your open source packages, as they will be available to everyone.
etc. etc.
Once you have decided on your strategy, you are ready to begin.
Creating a Provision
Log into AppsAnywhere as an admin user
Click on Return to Admin to access the admin portal
On the navigation menu at the top of the page, go to Provisioning > Manage Provisions
Click on the Add button on the top right of the page
You will then see form for creating a new provision. The most important fields are the first four you will see; Applications, Desktops, Mappings and Display Name:
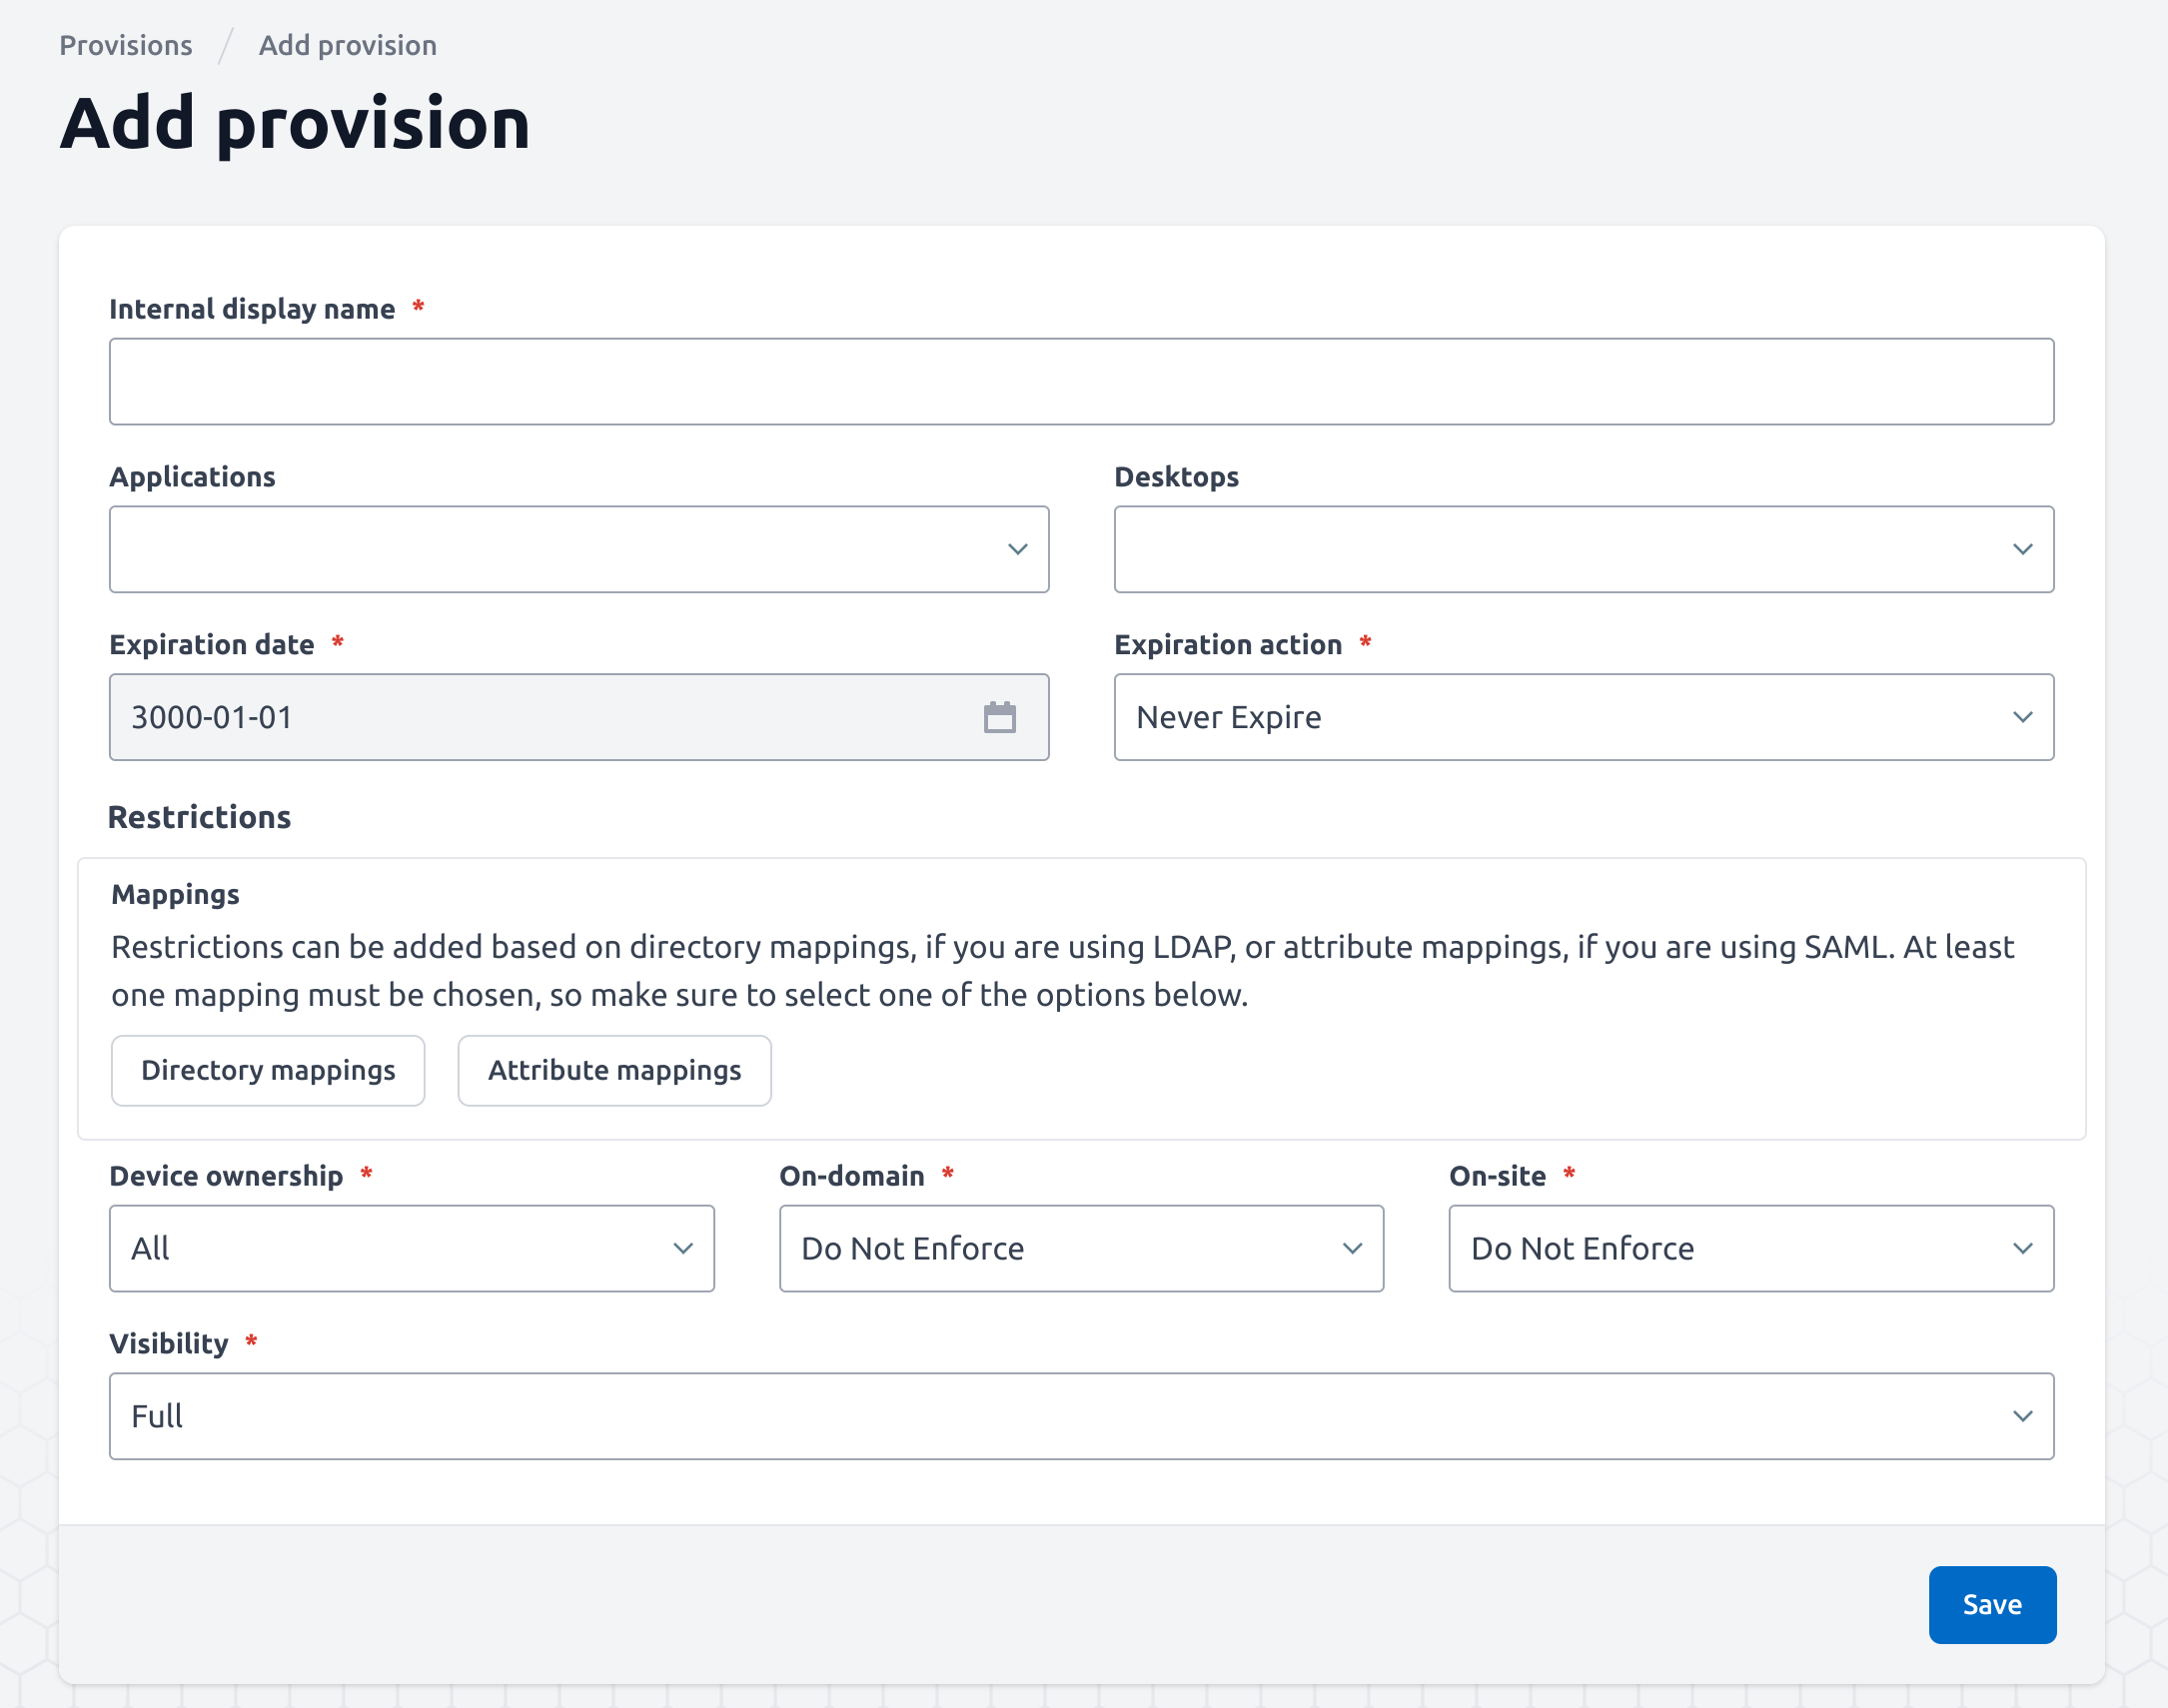
Set up the provision by completing these three fields:
Give your provision a name. This is purely for your benefit to remind you of what this provision represents
Select all the applications that you want this provision to provide access to
Select all the desktops that you want this provision to provide access to
You don't have to choose applications AND desktops for your provision, you can choose any number of either, as long as you assign at least one resource (application or desktop) to the provision.
Restrictions
Mappings
In order to grant access to the resources specified above, you will also need to choose which users this should apply to. This can be done using 1 of 2 methods - LDAP directory mappings or SAML attribute mappings. These options are described below, both can be useful depending on your current setup of LDAP and SAML.
Directory

Directory mappings can simply be selected using the dropdown menu as shown, you may pick as many records as you wish to give access to based on the provision strategy you employ. If you chose this option initially but wish to swap, you can use the Re-select button at the bottom of the restriction area.
If you select more than one directory record in the list, the resources will be available to anyone who matches (or whose device matches) against ANY of those records specified.
Attribute
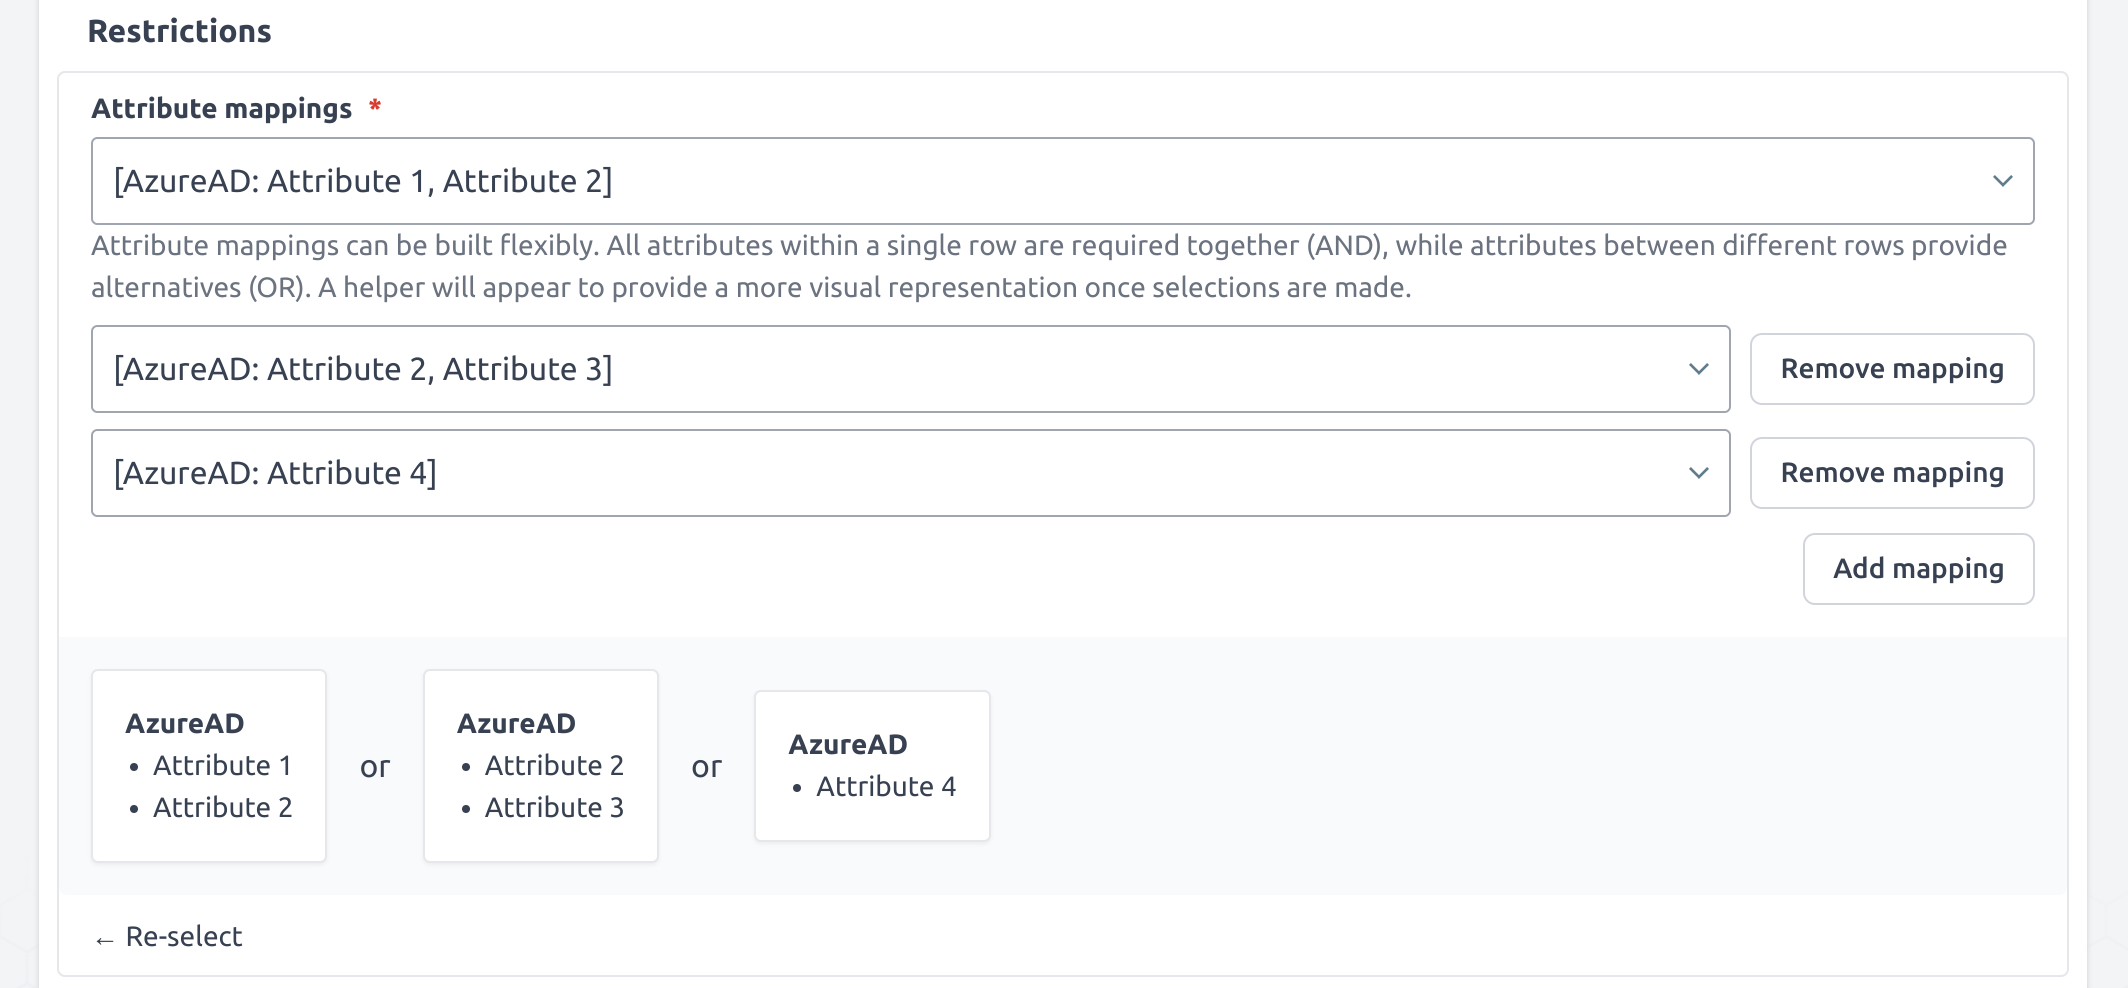
Attribute mappings can be much more complex, but allow for complete control of resources through SAML attributes (see Creating SAML Attribute Mappings for more information). From the image above you can see multiple mappings in place, these can be added and removed as required and are built by the attributes selected in the dropdown menus. The logic behind these mappings is that all attributes within a single set must be satisfied in order to have access to the resources listed.
Using the example above, a user might require Attribute 1 and Attribute 2 to gain access, or just Attribute 4. A user would be denied access if they only had Attribute 1 and Attribute 3.
If you chose this option initially but wish to swap, you can use the Re-select button at the bottom of the restriction area.
Further Restrictions
All provisions can have their own restrictions assigned to them to determine when they are applied. These work in conjunction with the restrictions applied to individual delivery methods. For more information on that, see the Provision vs DM Restrictions page.
If you want to add restrictions to where/when a provision is used, then you can do so using the fields provided on the rest of the create provision form:
Form Field Name | Explanation | Expected Value | Example |
|---|---|---|---|
Expiration Date | Allows you to specify a date after which the provision is considered to be expired. What happens when this time is reached depends on the value of the Expiration Action field below | The date after which you want the provision to expire | 2020-01-01 |
Expiration Action | Dictates what happens when the expiration date is reached. Options are:
| The action that you want AppsAnywhere to take when the provision expires | Expire With Notice |
Device Ownership | Dictates on what kind of devices the provision will be made available. Choose the value that reflects the desired behavior for this provision | "Organisation-Owned", "User-Owned" or "All", depending on which devices you want the provision to apply on | User-Owned Only |
On-Domain | Dictates whether the provision will be available when the user is accessing the system on a non-domain-joined device. Choose "Enforced" if you want the provision to only be active when the user is using a domain-joined device | You would usually set this to "Do Not Enforce" | Do Not Enforce |
On-Site | Dictates whether the provision will be available when the user is accessing the system from off-site. Choose "Enforced" if you want the provision to only be active when the user is on-site | You would usually set this to "Do Not Enforce" | Do Not Enforce |
Visibility | Dictates whether the apps in this provision should be visible in AppsAnywhere. If you are only launching apps through advertised shortcuts then you may not want them to be accessible through the AppsAnywhere interface, in which case you can set the visibility for the apps in the provision to "None" | In the vast majority of cases, this value should be left as "Full" | Full |
If all you need to do is provide someone with access to an application or desktop, then that's all there is to it, just hit the 
You will then be sent back to the Viewing Provisions page, where you should see your new provision and the following message:
All provision assignments are calculated at login, so in order to test any changes you have made to a provision, including new ones you have added, affected users will need to log out of AppsAnywhere and log back in.