
SAML Azure
Overview
In this article, we'll take a look at how to set up SAML 2.0 in Azure Active Directory.
AppsAnywhere currently supports the following SAML 2.0 providers:
Azure Active Directory (this page)
Active Directory Federation Services (ADFS)
Shibboleth 2
Any custom SAML 2.0 provider
The method you use will depend on the system you are trying to link AppsAnywhere to. This guide will take you through setting up SAML 2.0 within AzureAD.
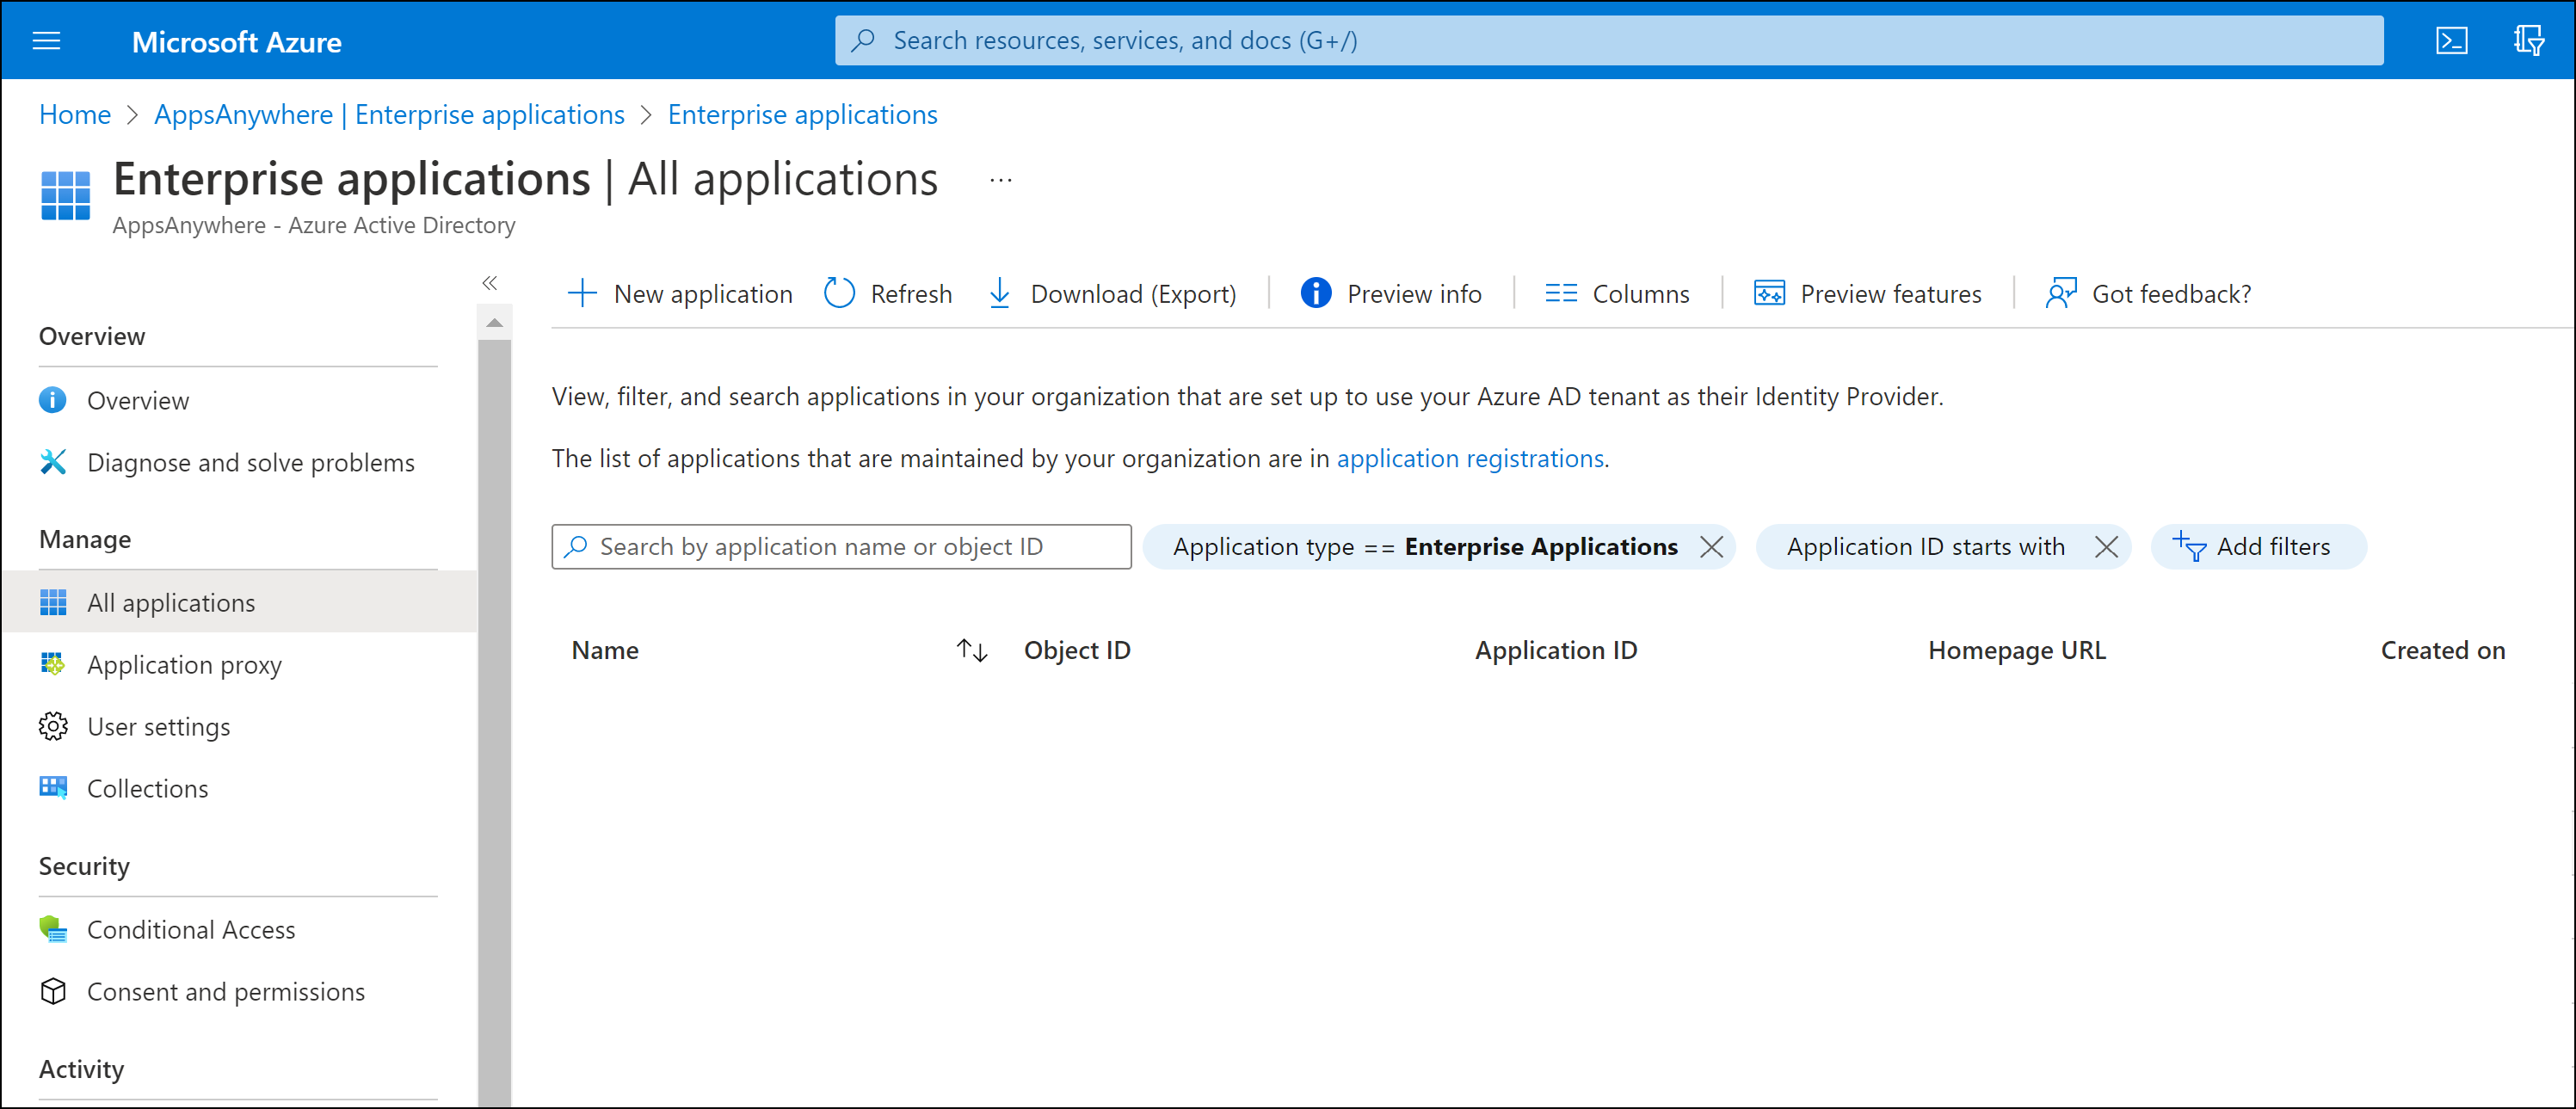
AzureAD Enterprise Application
Log into your institution's Azure Portal as a system administrator.
Create Enterprise Application
Click Azure Active Directory from the drop down menu (accessible via the top right-hand corner button)
On the AzureAD sub menu, click Enterprise Applications
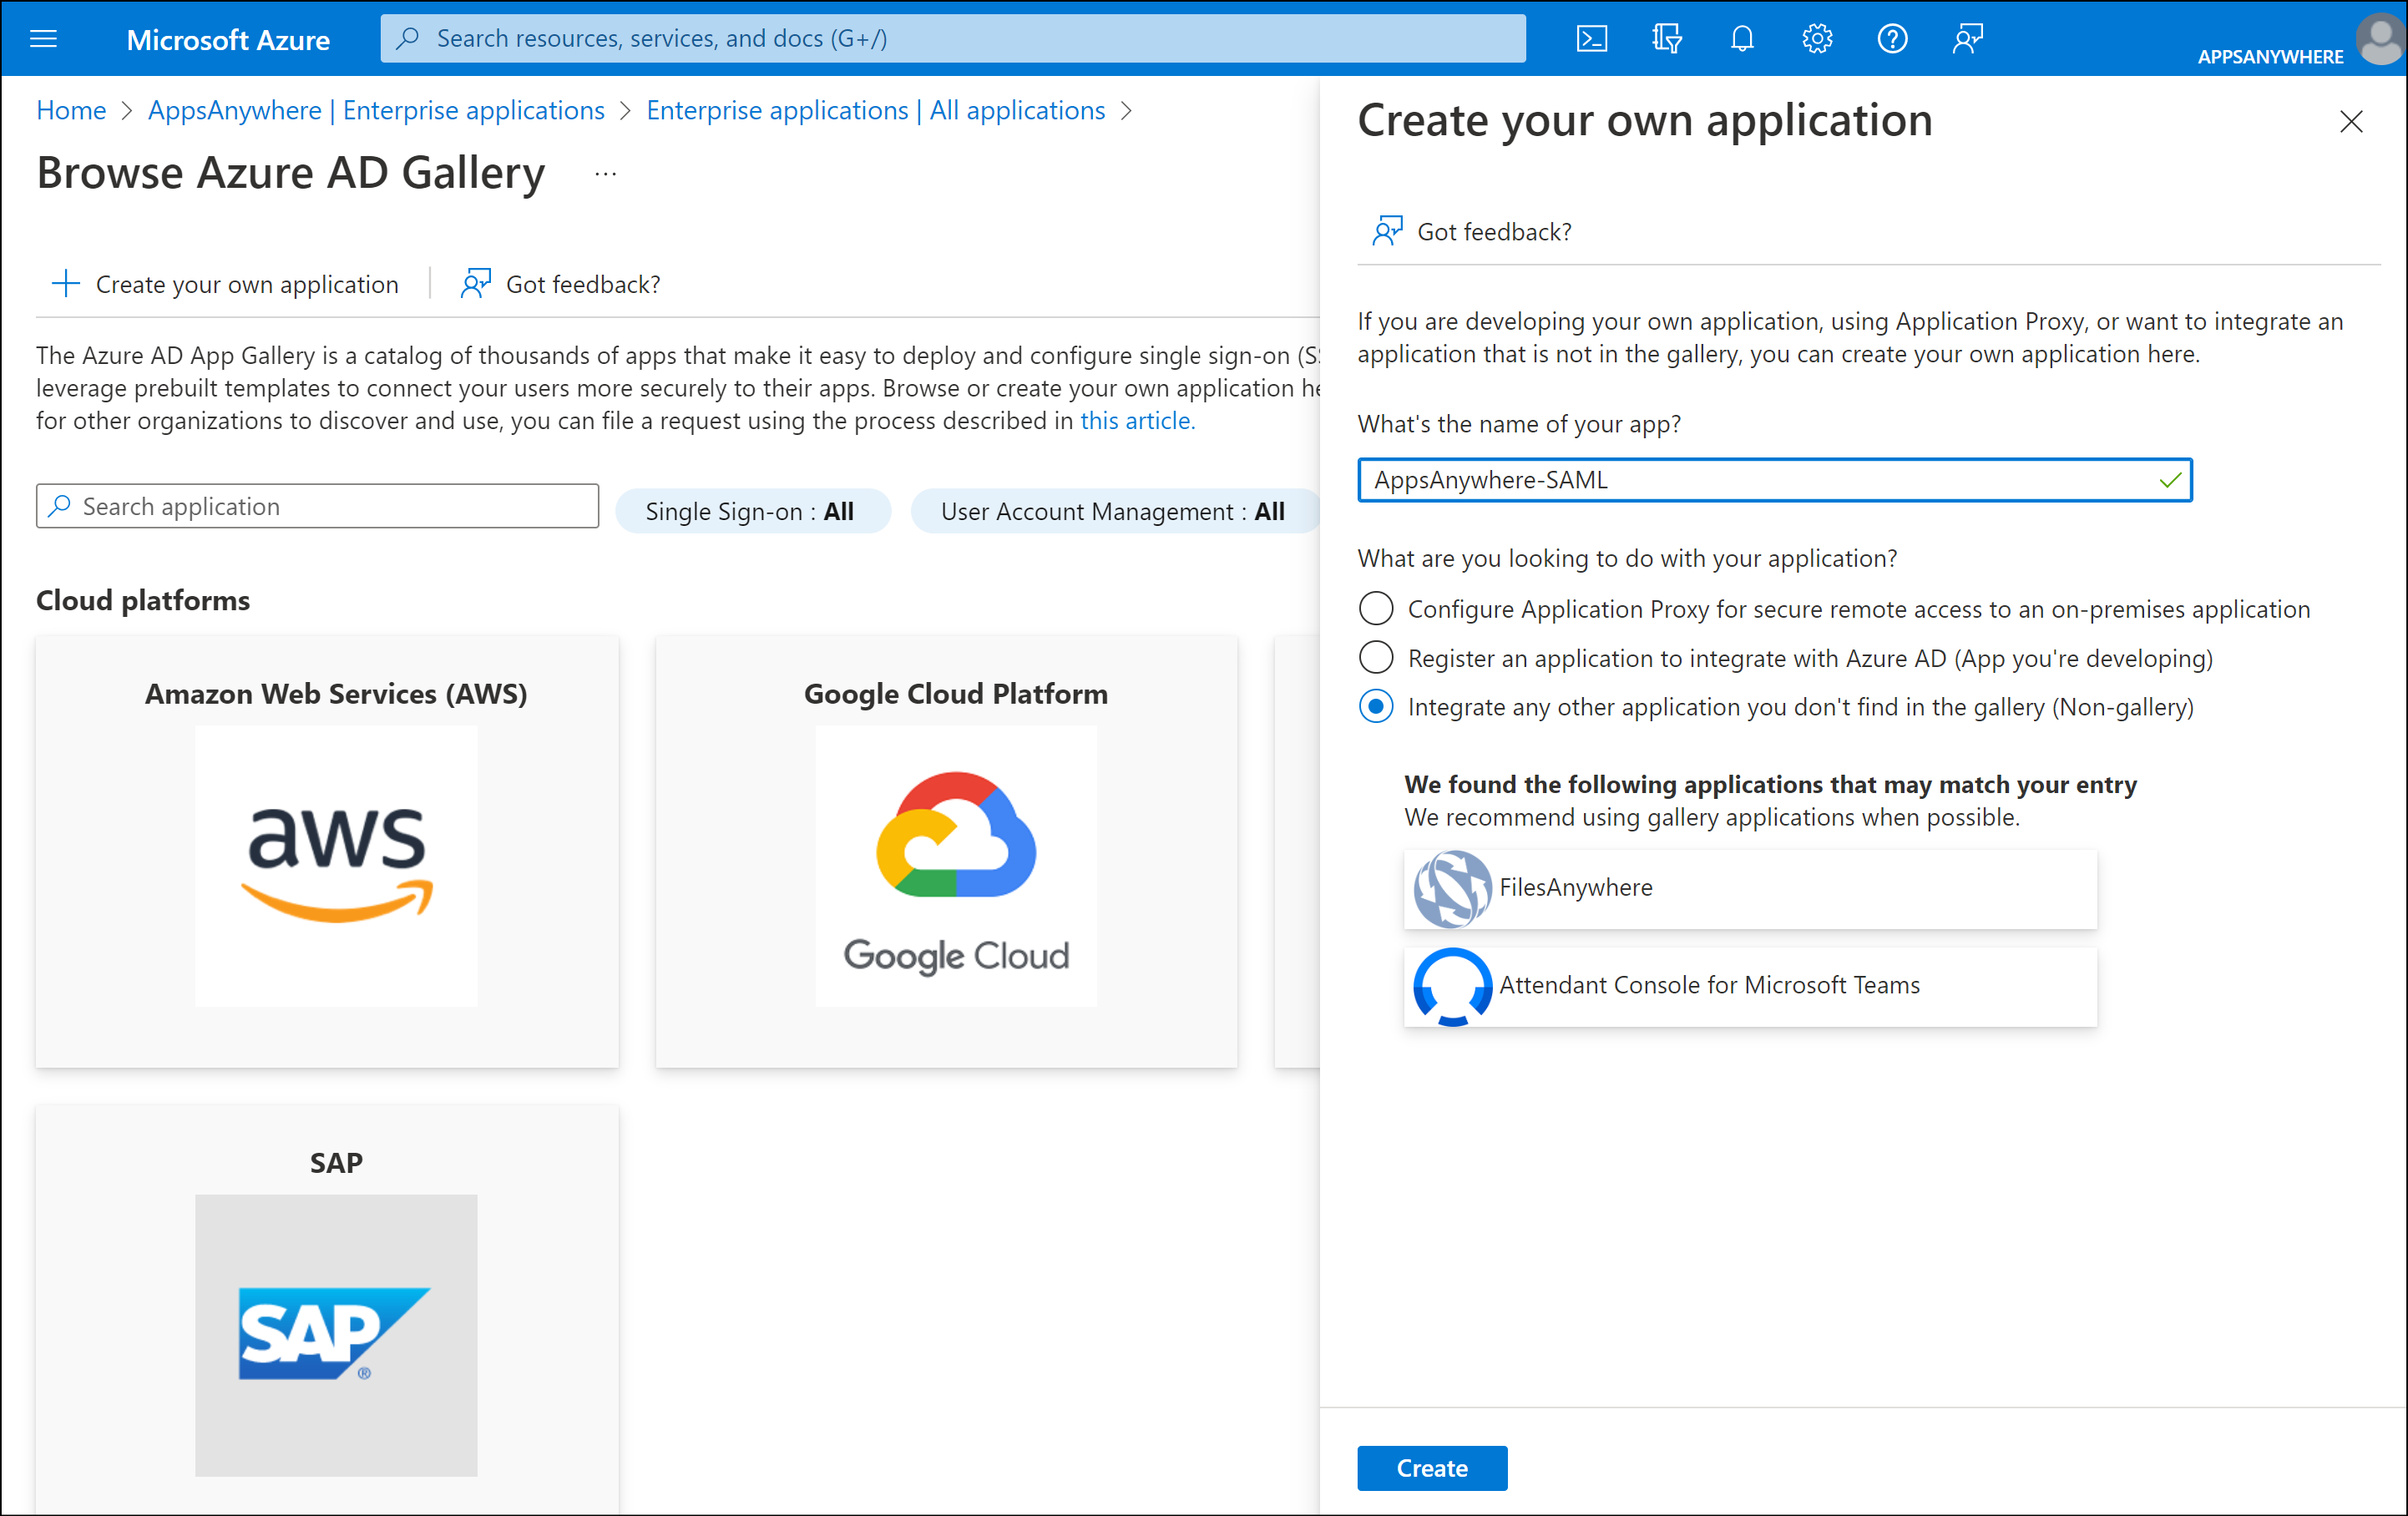
Click New application
Click Create your own application.
Enter a your preferred friendly name for this app under What’s the name of your app?
e.g. AppsAnywhere-SAML
Ensure the “Integrate any other application you don’t find in the gallery (Non-gallery)” option is selected.
Click Create
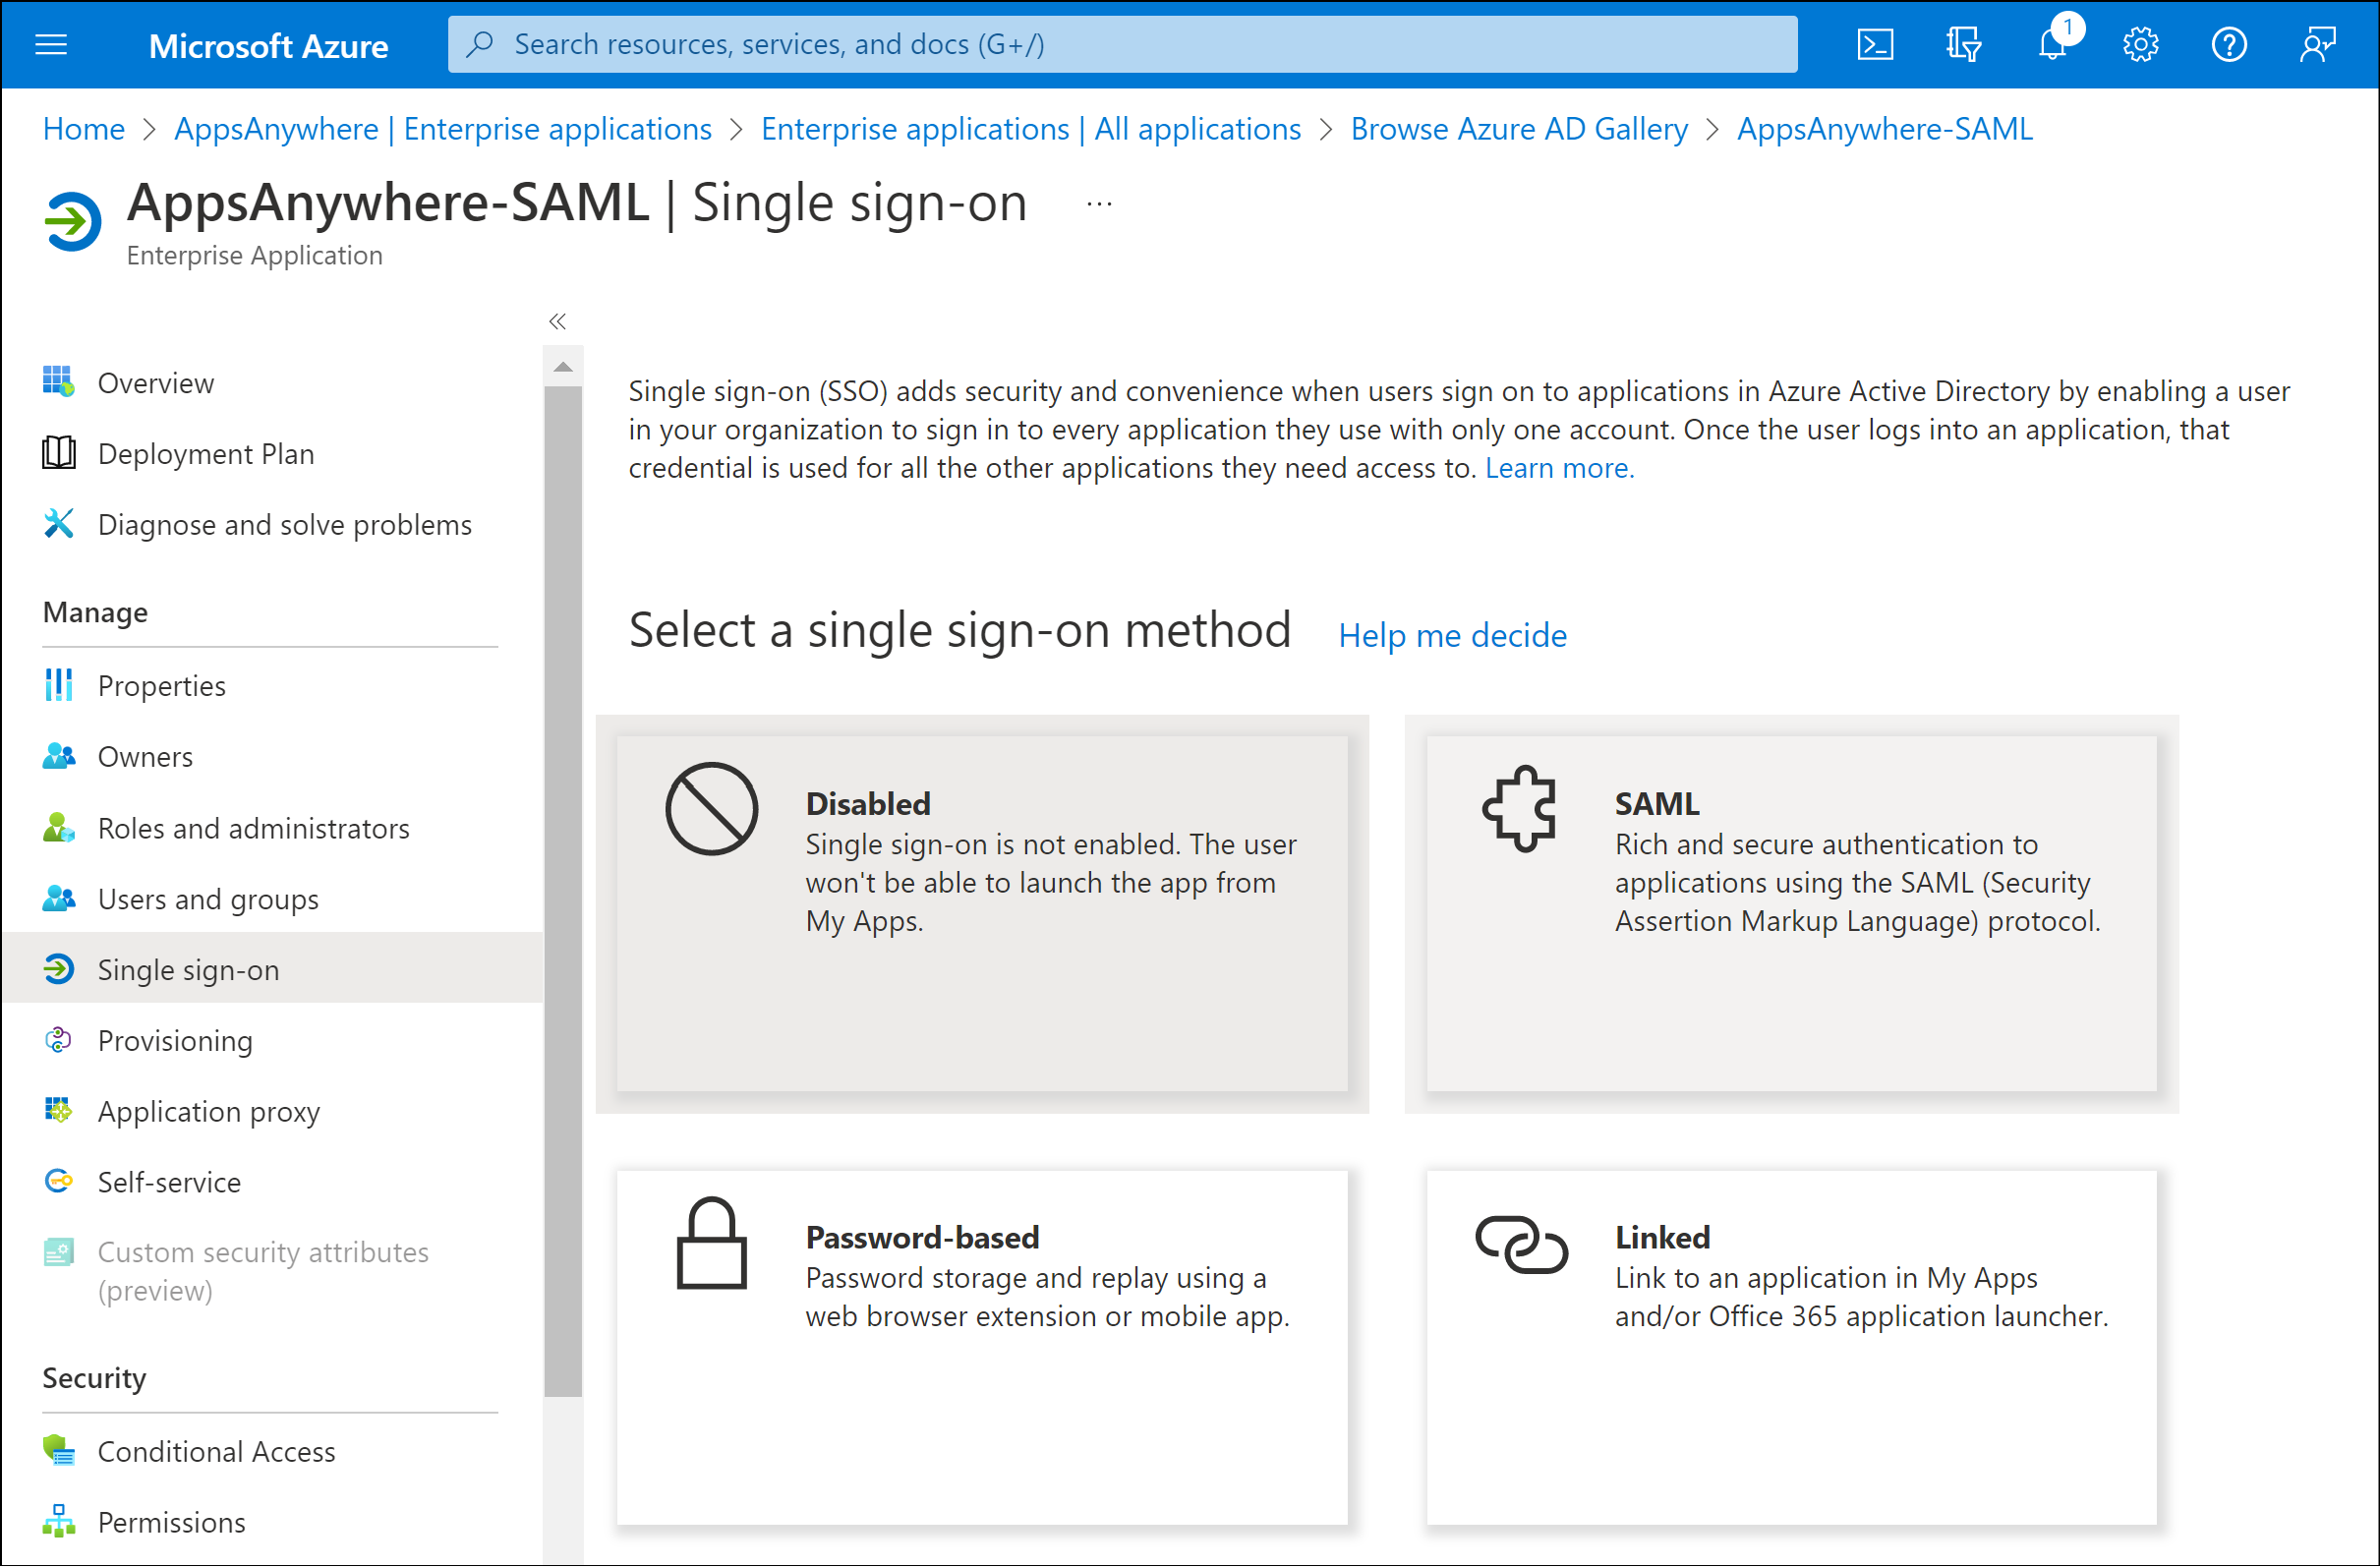
Single sign-on settings
Select the Single sign-on option from the sub menu.
Click the SAML method.
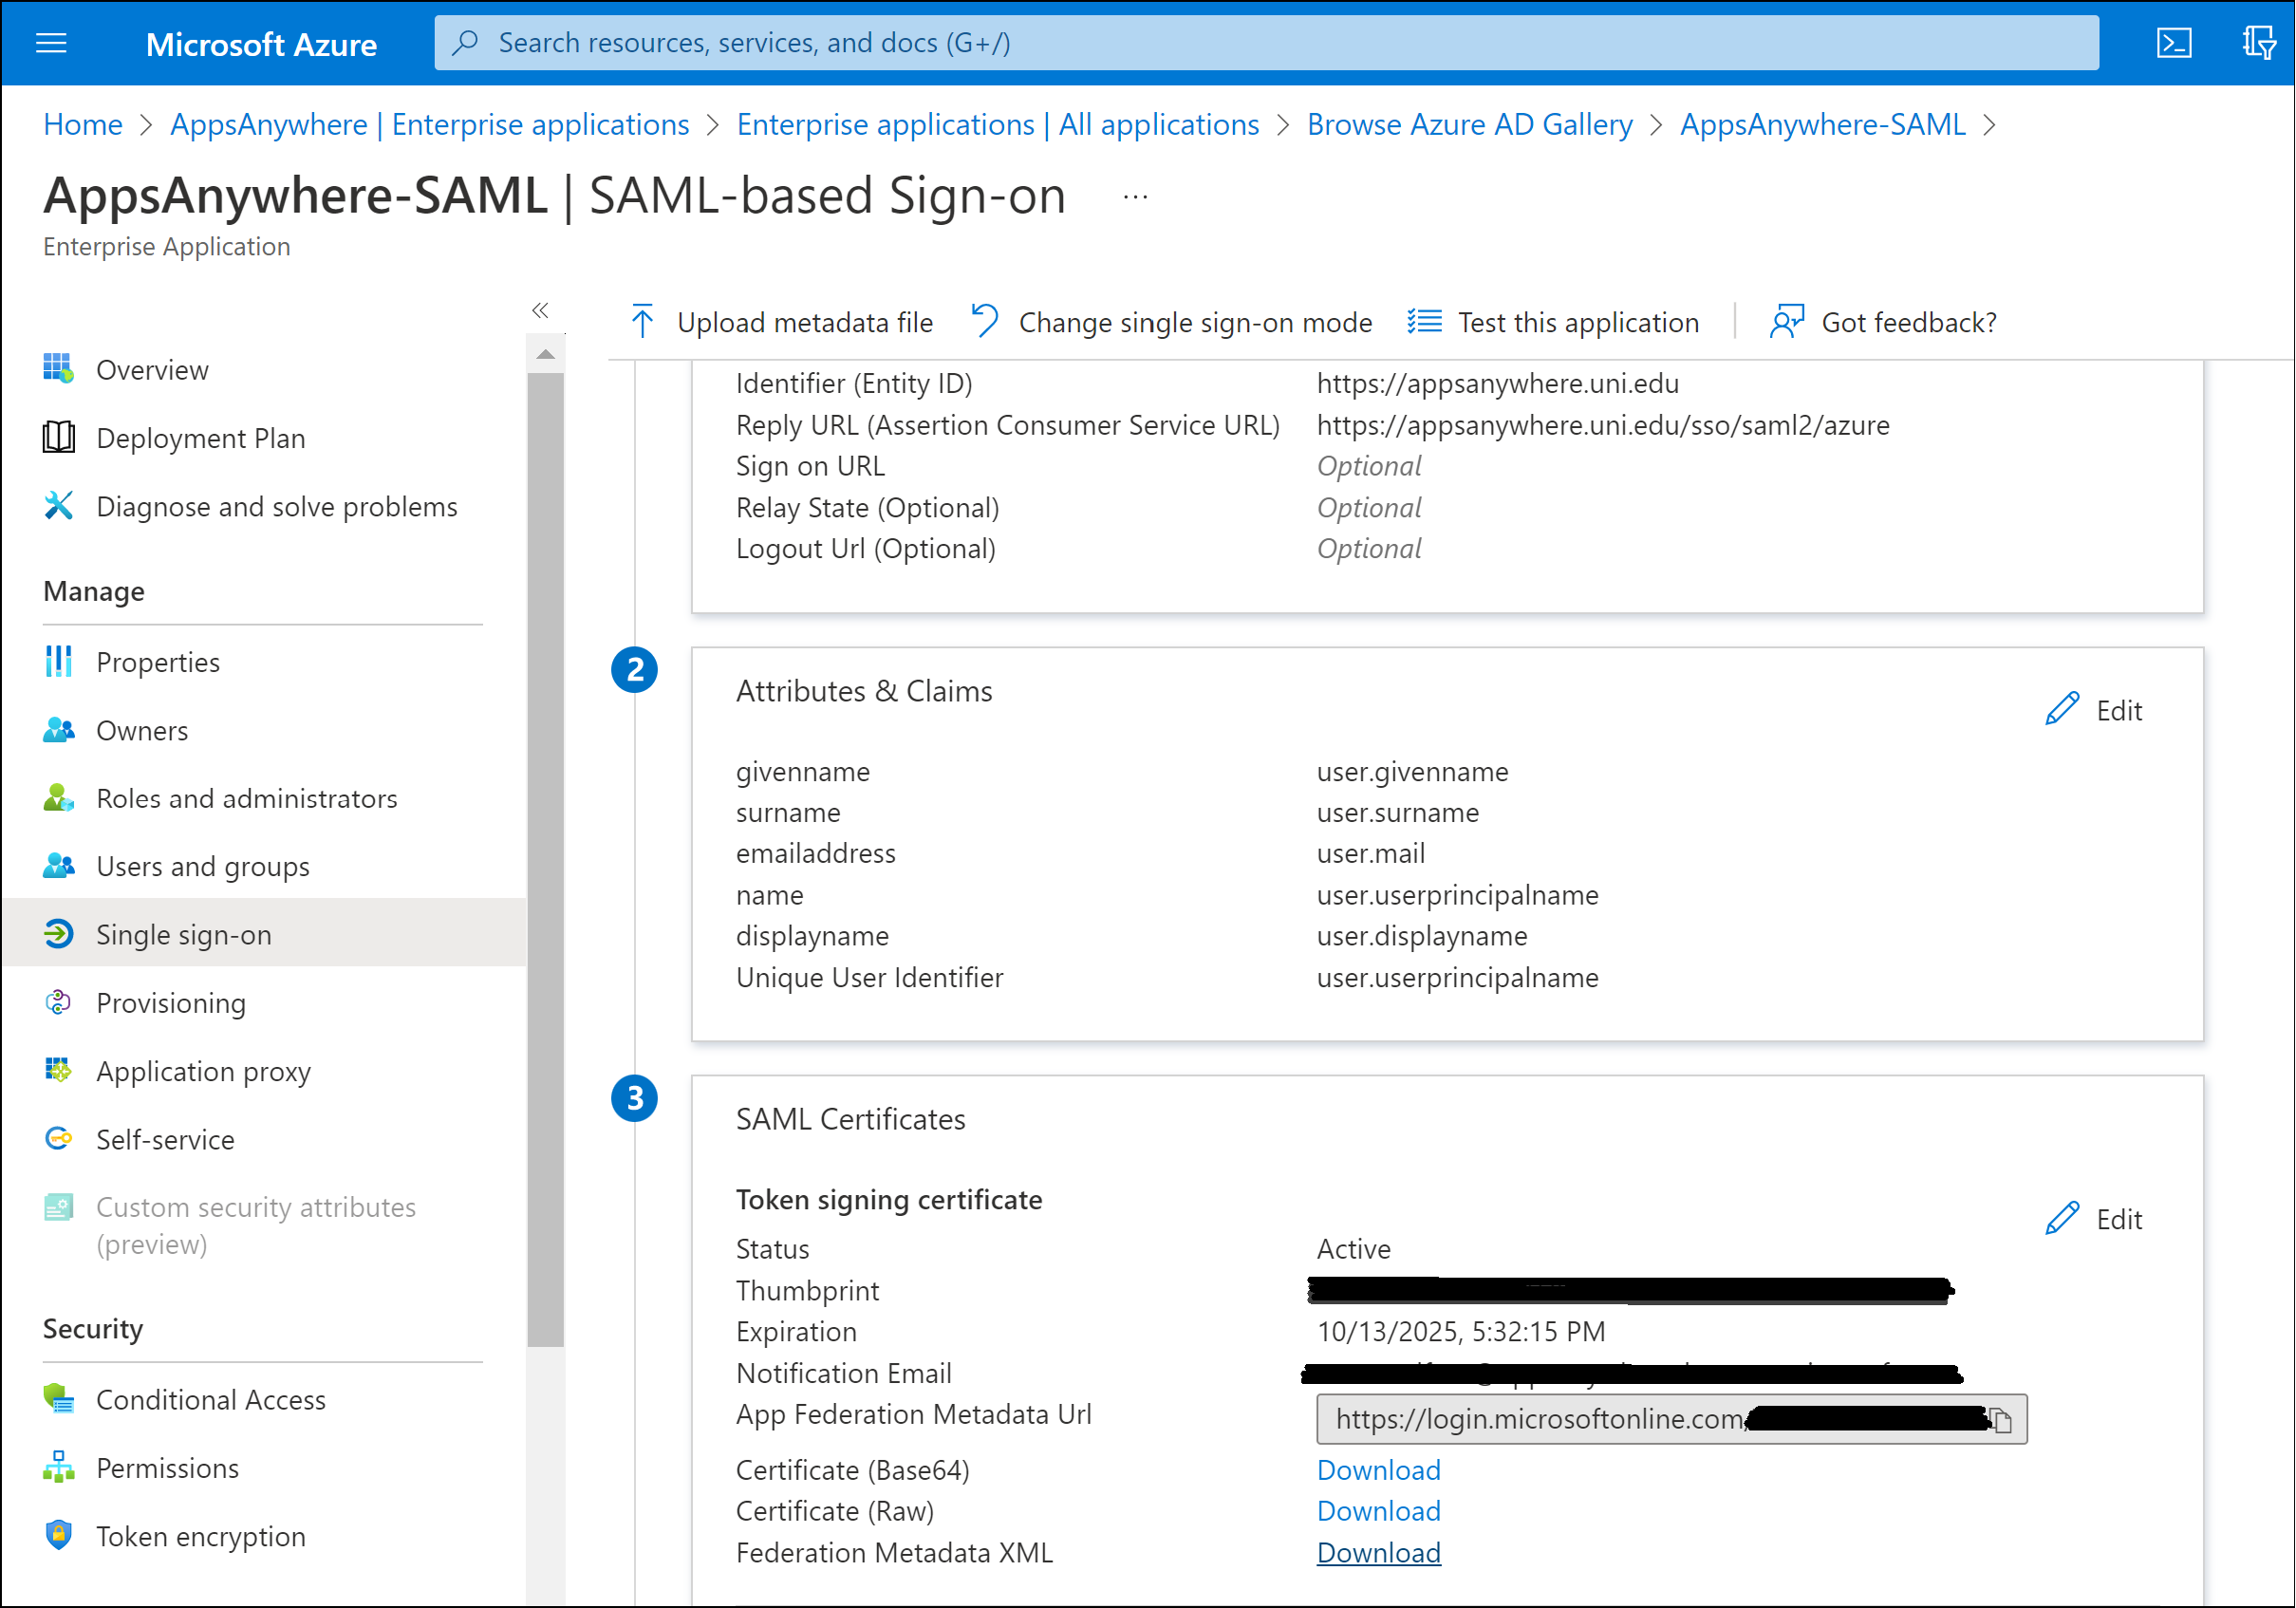
Basic SAML Configuration
Click Edit within the Basic SAML Configuration section.

Enter the required values into the Identity (Entity ID) and Reply URL (Assertion Consumer Service URL) fields.
The Identity (Entity ID) value is used as a unique identifier for the SAML configuration, this is normally application/service specific. It is recommend (and by default) this value is set to your AppsAnywhere service URL
e.g. https://appsanywhere.uni.edu
The Reply URL (Assertion Consumer Service URL) value defines the AppsAnywhere URL that the SAML response/information is sent to once an authentication request has been process by the SAML provider (Azure in this instance)
e.g. https://appsanywhere.uni.edu/sso/saml2/azure
The Reply URL is comprised of your AppsAnywhere service URL e.g. https://appsanywhere.uni.edu, the default AppsAnywhere SSO provider path /sso/saml2 and a URL identifier for this sso method in AppsAnywhere; in this example we are using /azure
Please be aware that the AppsAnywhere SSO provider path /sso/saml2 is specific and MUST be entered exactly as per this example.
You can use an alternative URL identifier (friendly name) to replace the /azure part if you wish. However, it must not contain any non-alphanumeric characters or spaces. It must be a single word.
It is important you make a note of your chosen Reply URL as it will be required in a later step when defining the Single Sign-On method within AppsAnywhere.
Click Save to continue.

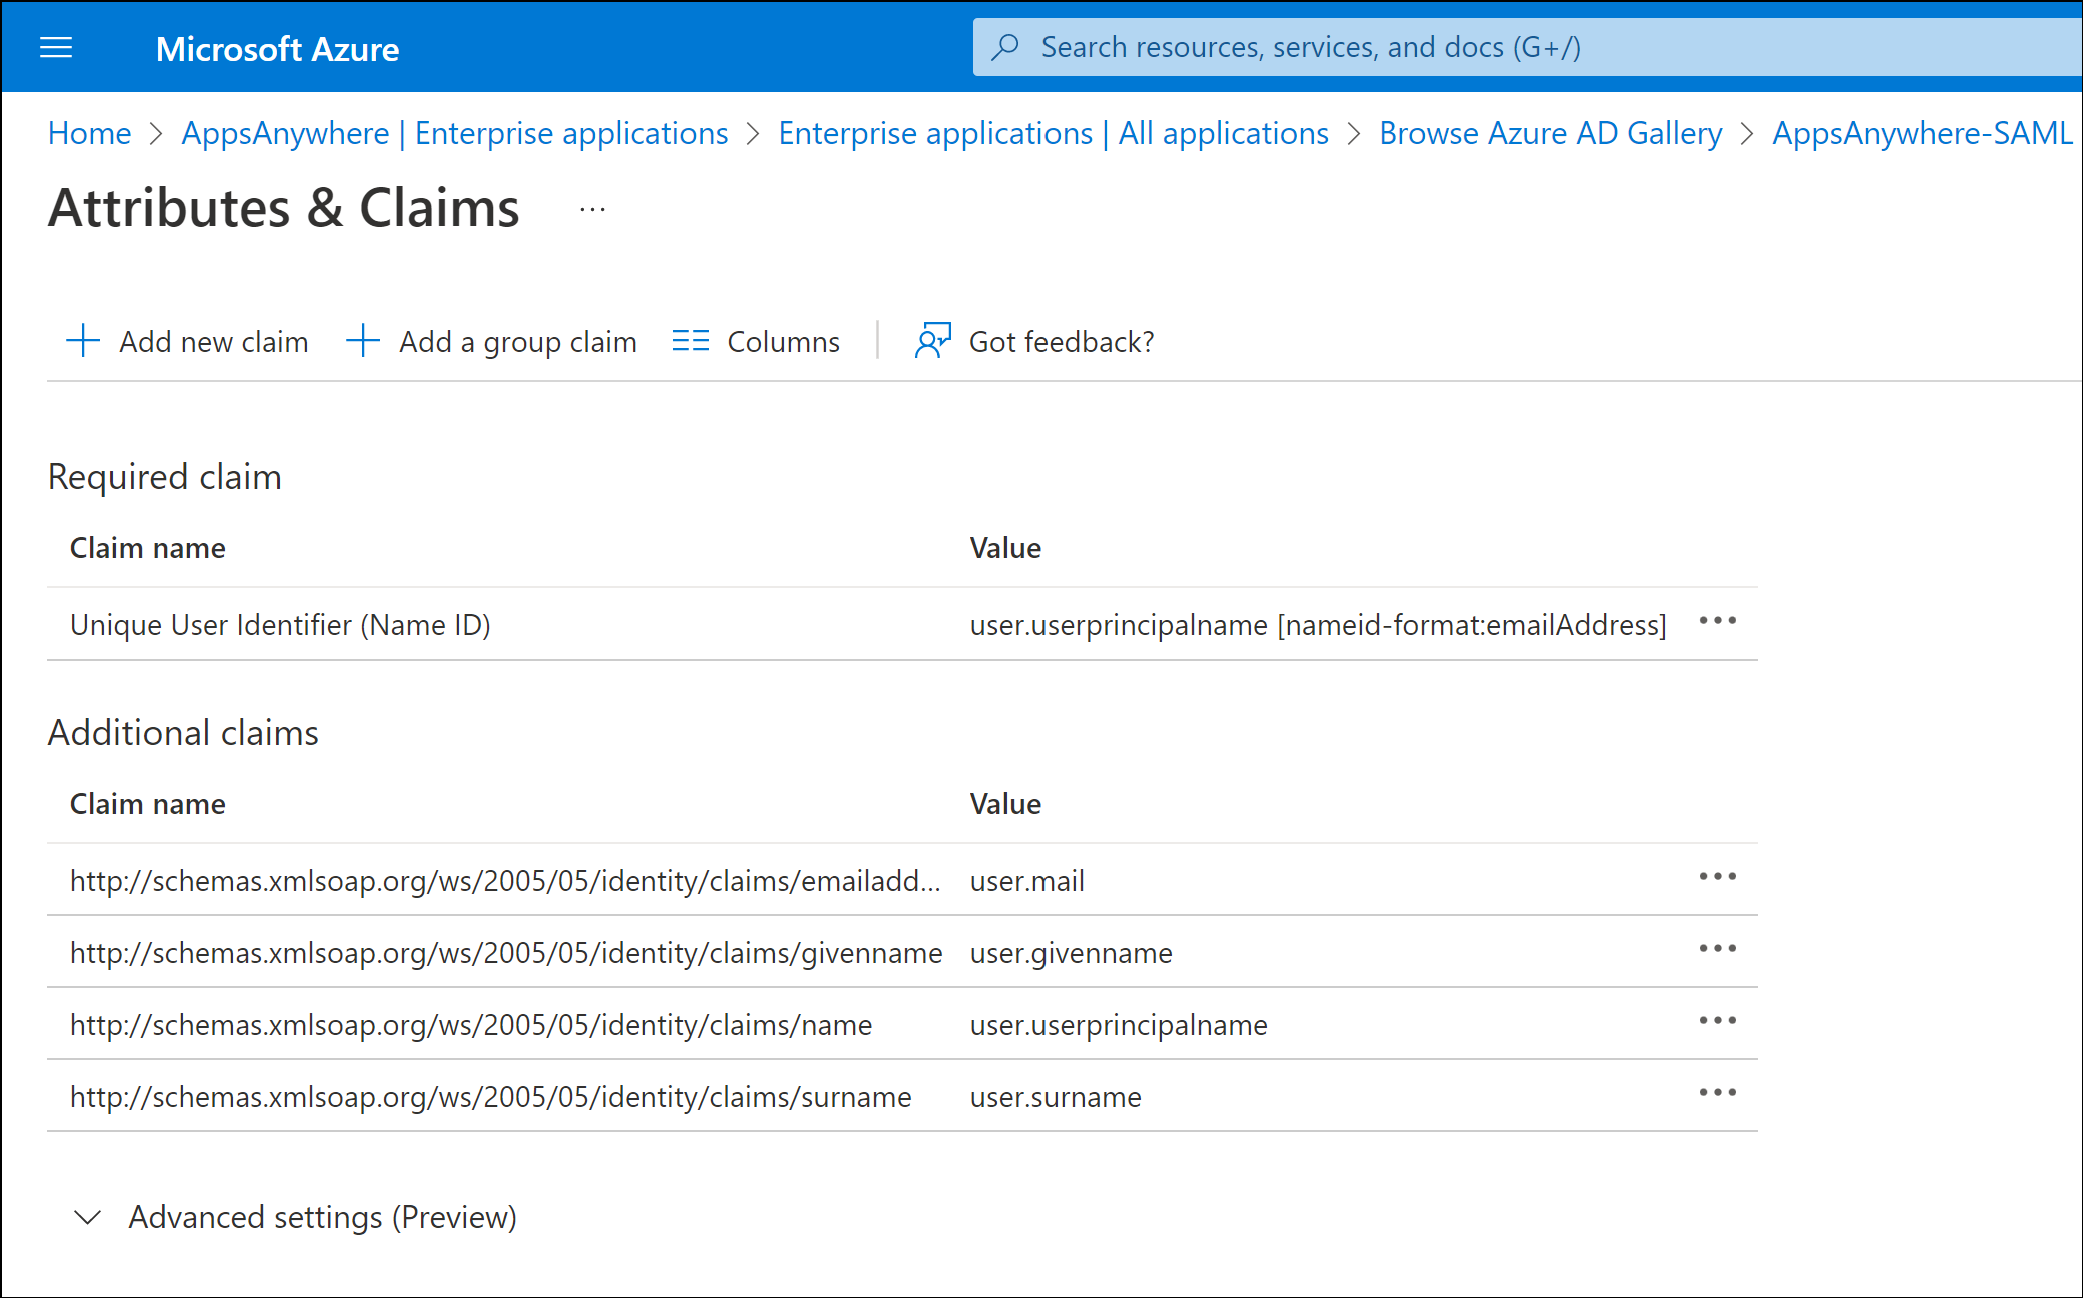
Attribures & Claims
Click Edit within the User Attributes & Claims section.
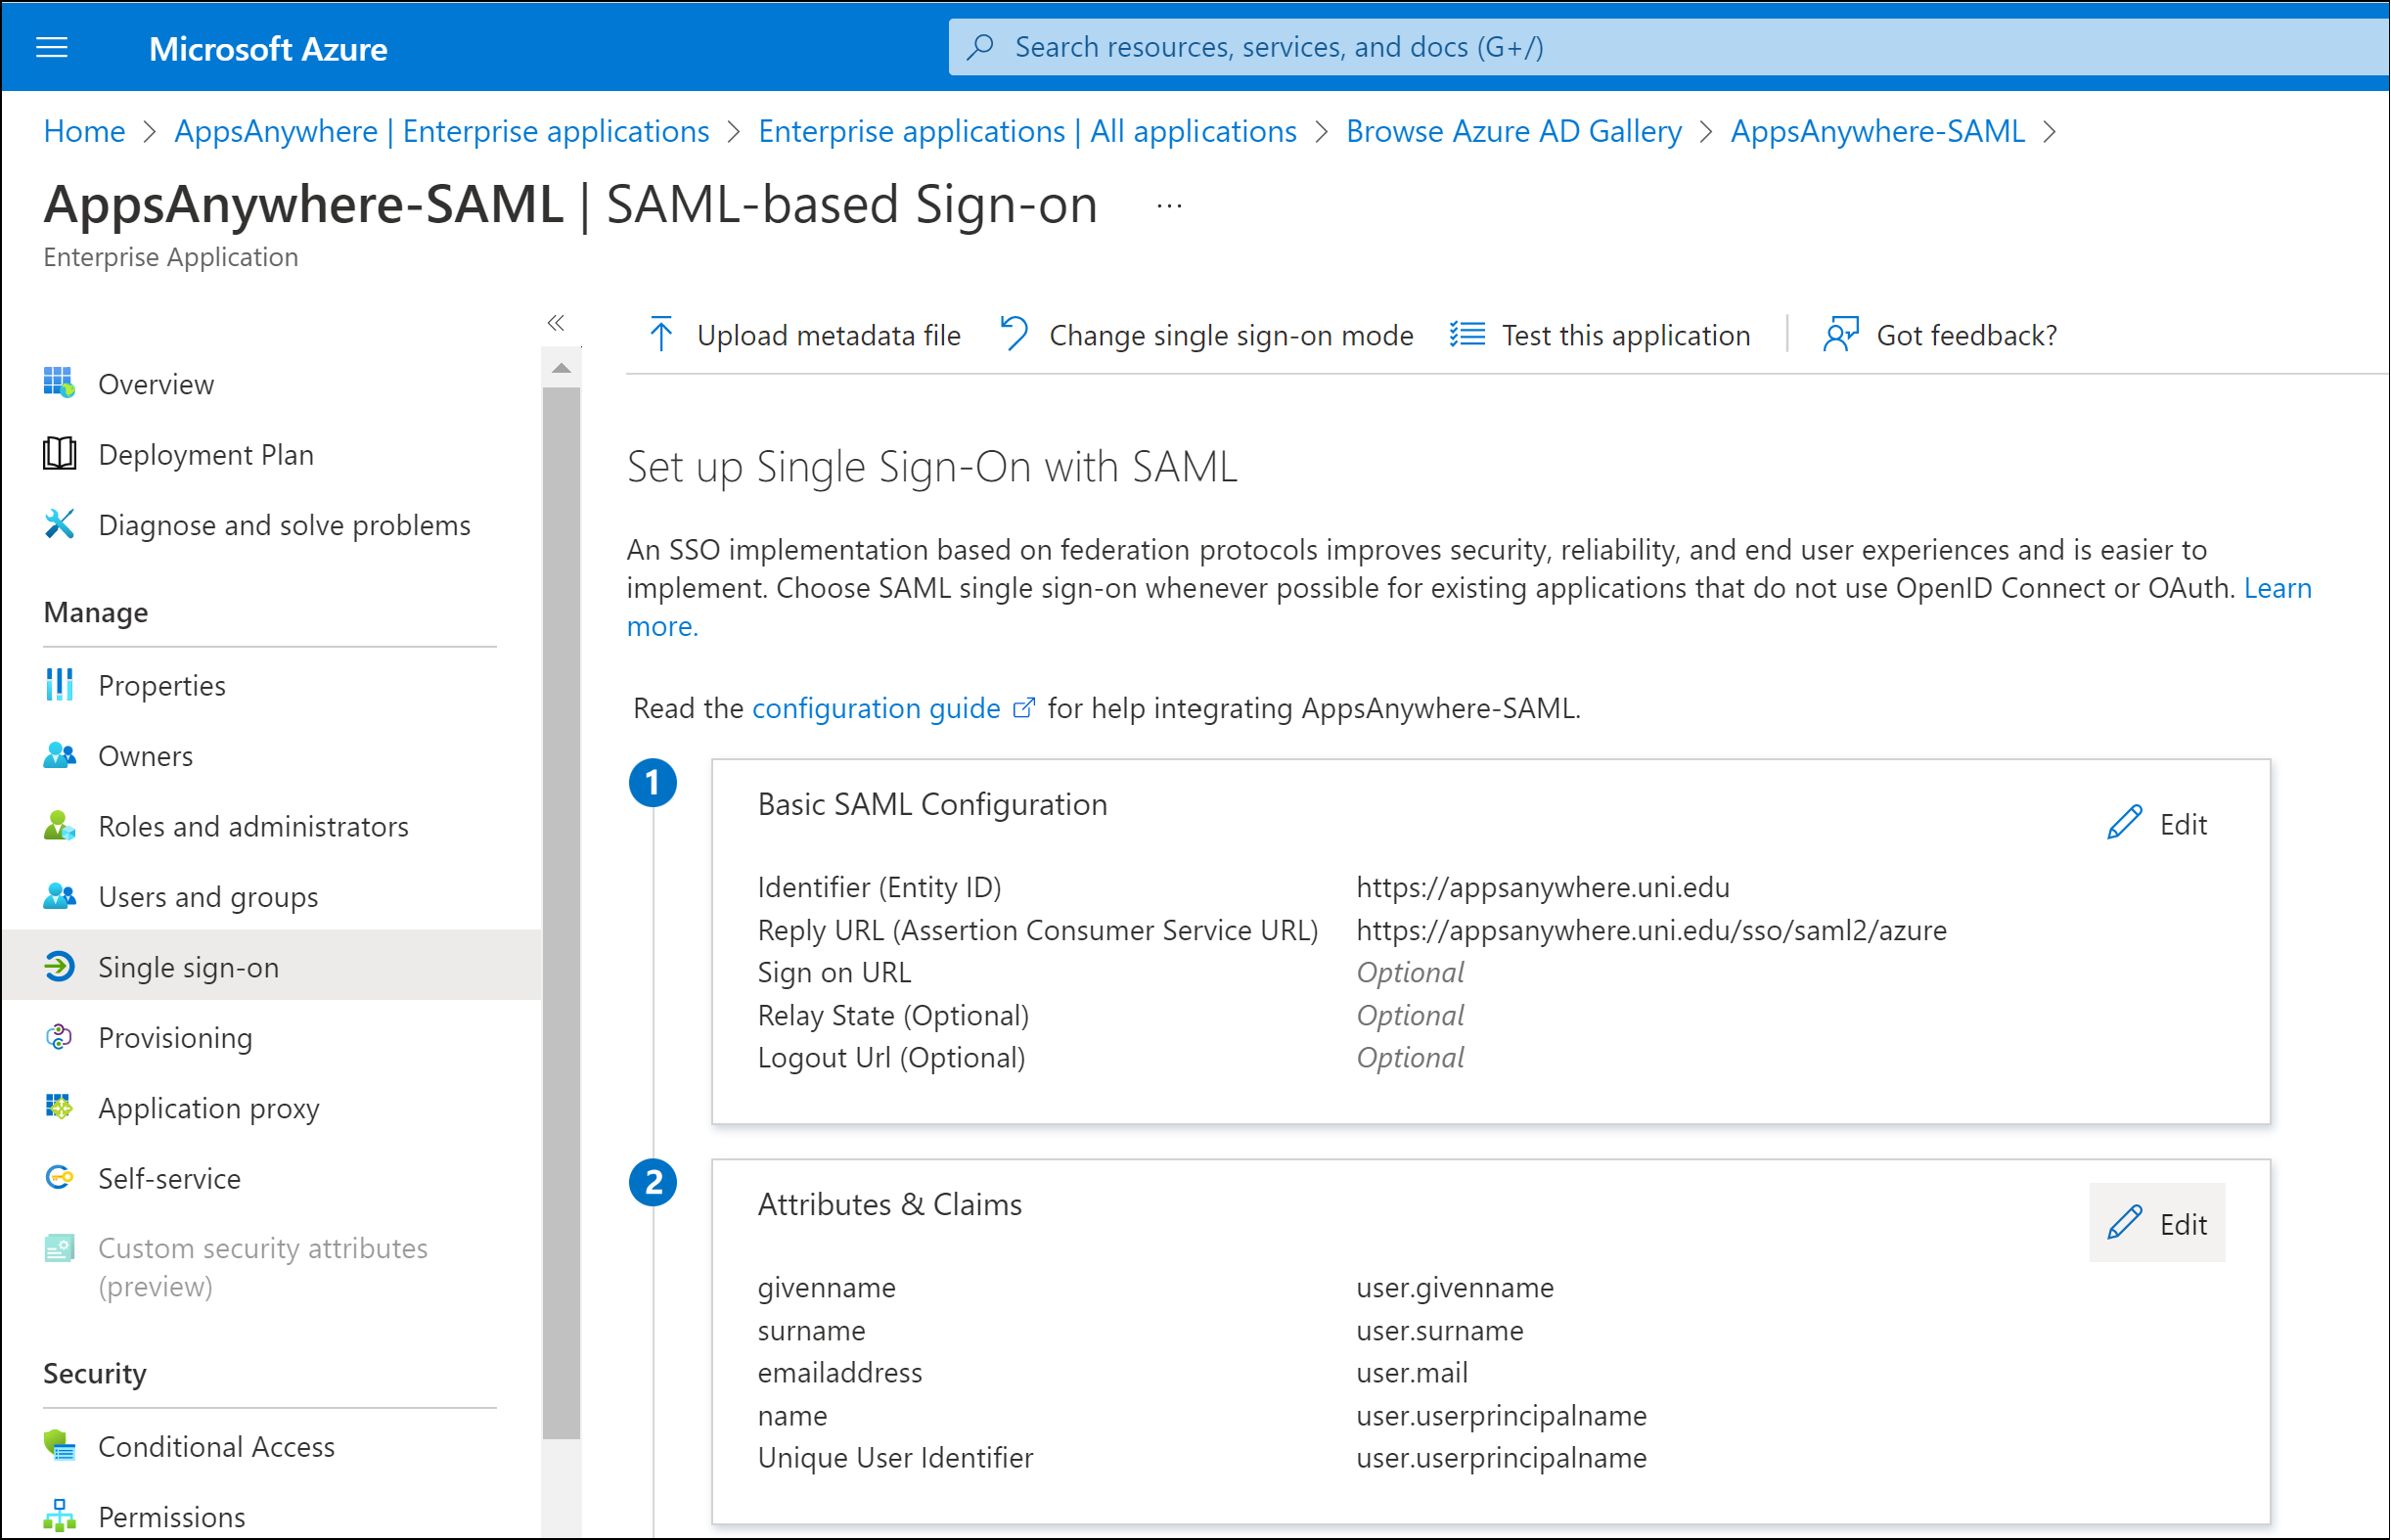
By default there are a number of attributes that are passed within the SAML response. These claims contain user attributes that can be used by AppsAnywhere to determine the identity of the user.
The most common value used to represent the user's identity is the user.userprincipalname attribute and value.
In order to use this value, you need to make a note of the Claim Name for the user.userprincipalname value
e.g. http://schema.xmlsoap.org/ws/2005/05/identity/claims/name
This value is required for a later step when defining the Single Sign-On method within AppsAnywhere.
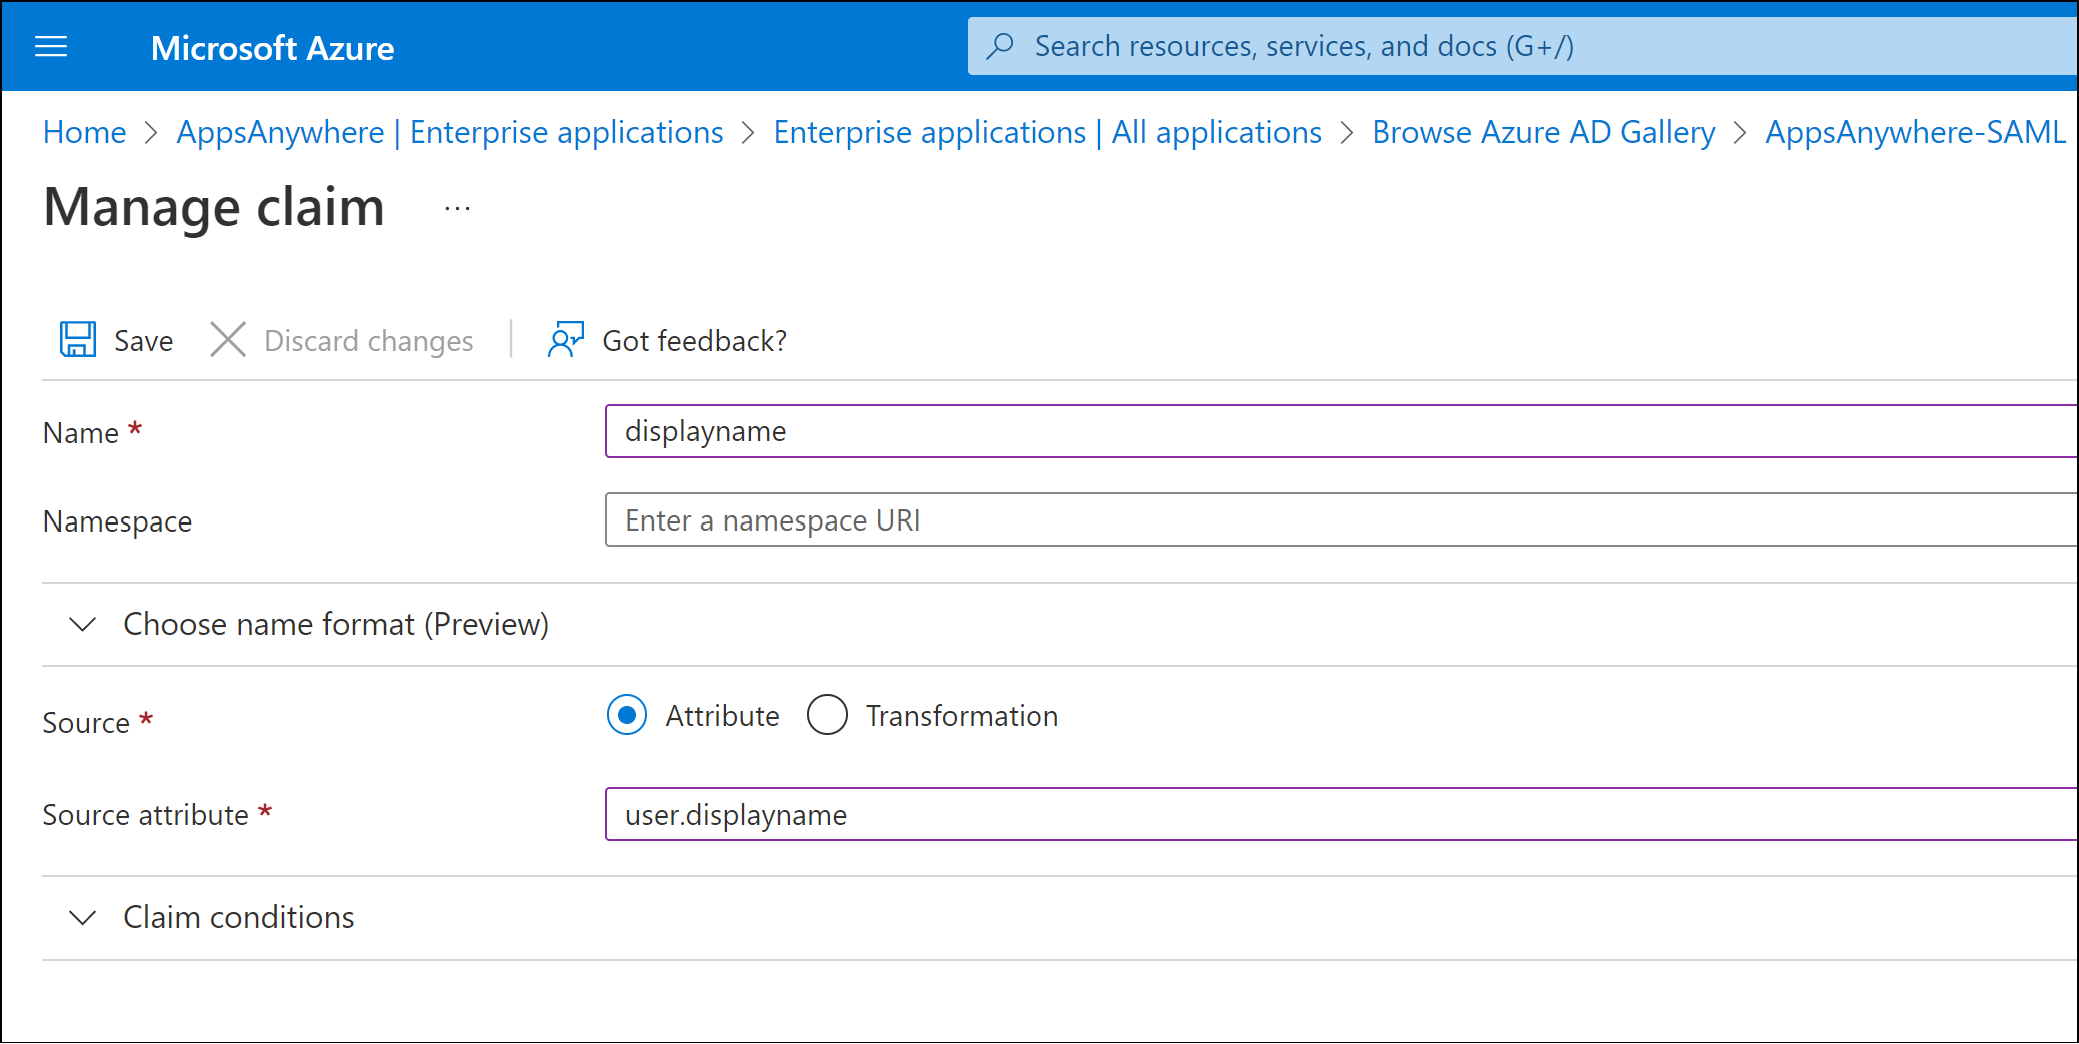
Add displayname claim
In addition to the default claims and attributes, a new claim needs to be added to pass the user’s display name property.
Click Add new claim
In the Name field enter displayname as the name of the claim that will be passed in the SAML response.
The Name value defined is a text label that is associated with the selected attribute in the SAML response. If you have chosen to use a different name, please make a note of the value as it will be required in a later stage.
Ensure the Source option is set to Attribute
In the Source attribute drop down list, select the user.displayname attribute.
Click Save
Close the User Attributes & Claims section to return to the SAML-based Sign-on page.
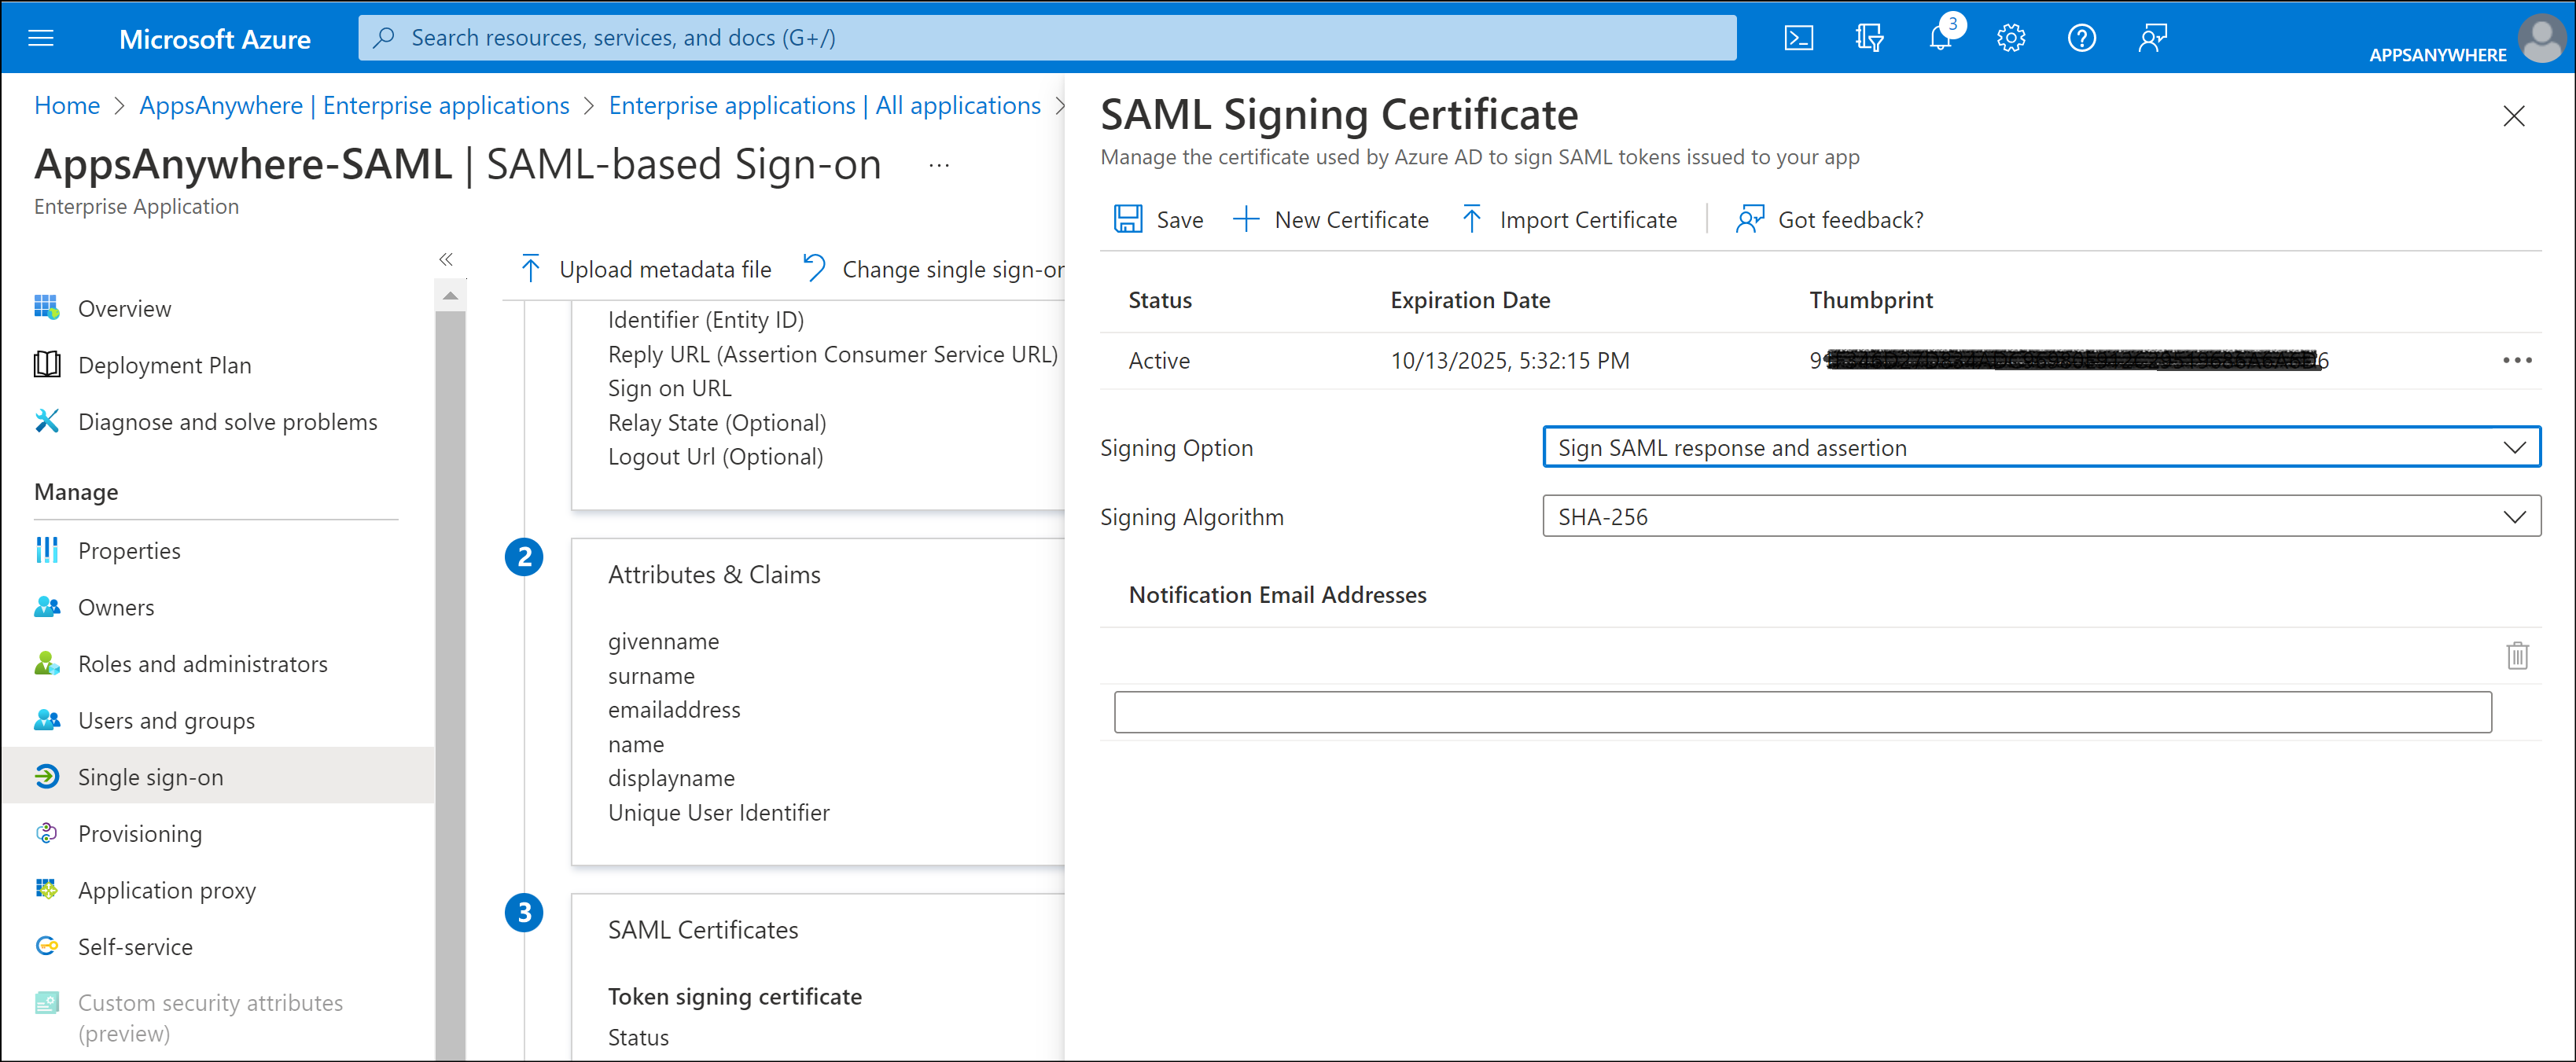
SAML Certificates
Click Edit within the SAML Certificates section.
Change the Signing Option value from the default Sign SAML assertion to Sign SAML response and assertion
Click Save.
Federation Metadata
Click Download next to the Federation Metadata XML option within the SAML Certificate section.
The Federation Metadata XML file will be used to configure the identity provider options within AppsAnywhere (when you define the AppsAnywhere SAML Single Sign-On method as below).
AppsAnywhere SAML Single Sign-On Method
Log into AppsAnywhere as a System Admin user.
Navigate to the AppsAnywhere Admin section.
Select Single Sign-On from the settings menu.
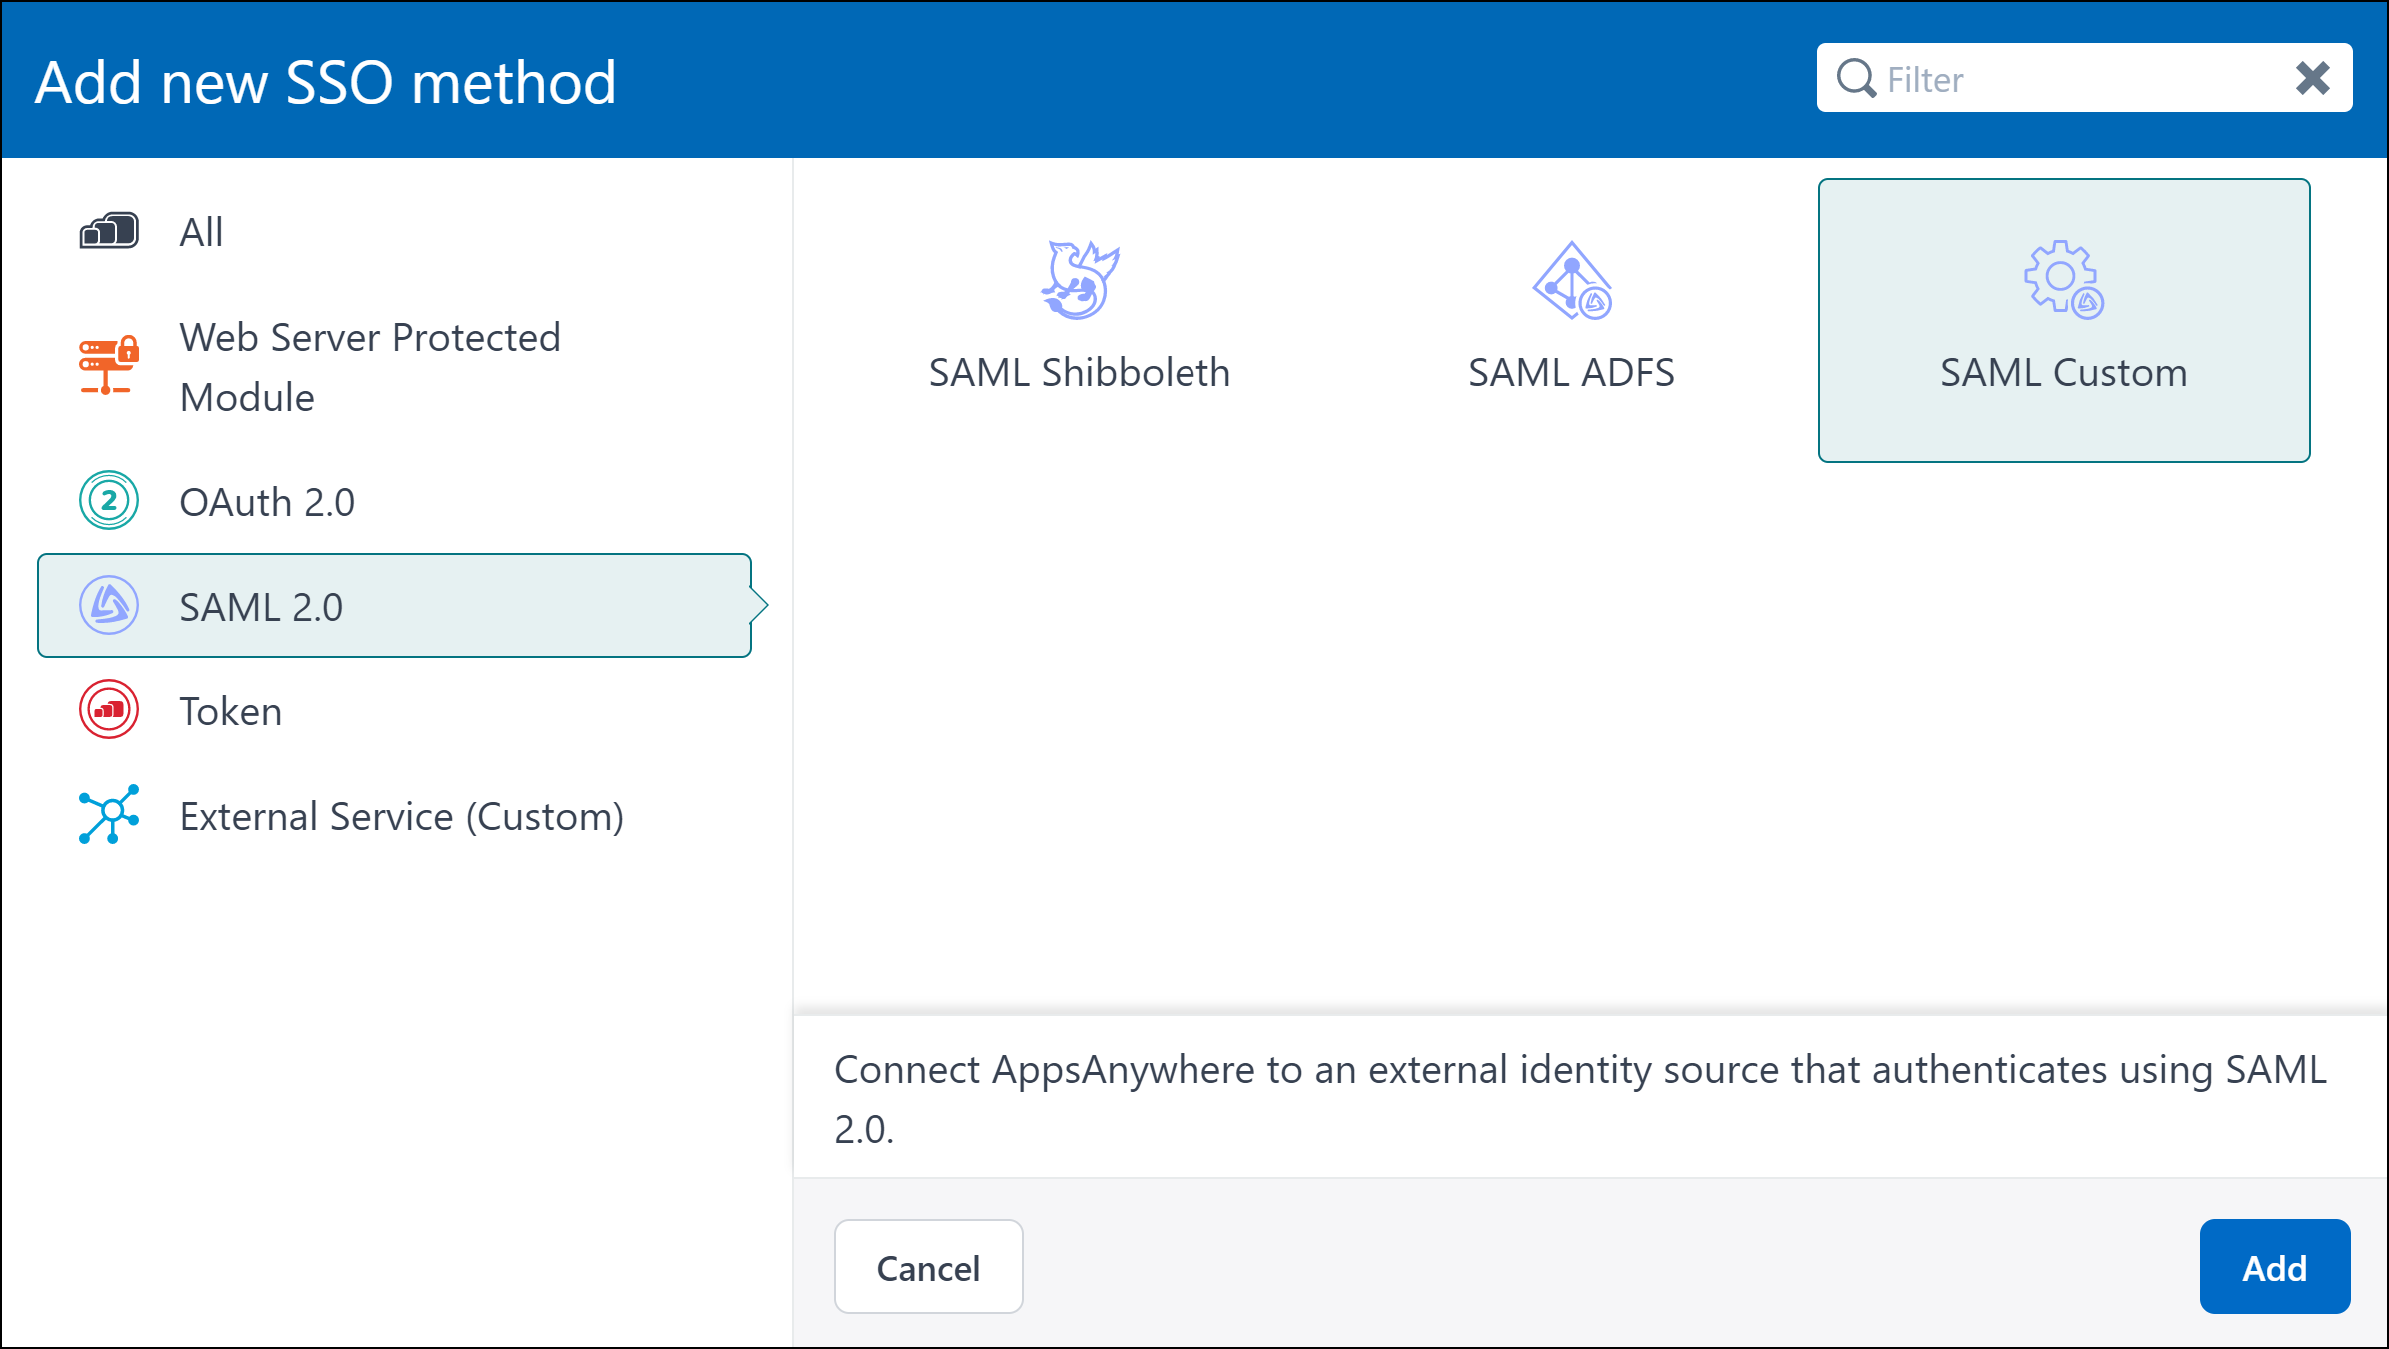
Click Add New Method.
From the SAML 2.0 section select the SAML Custom option.
Click Add.
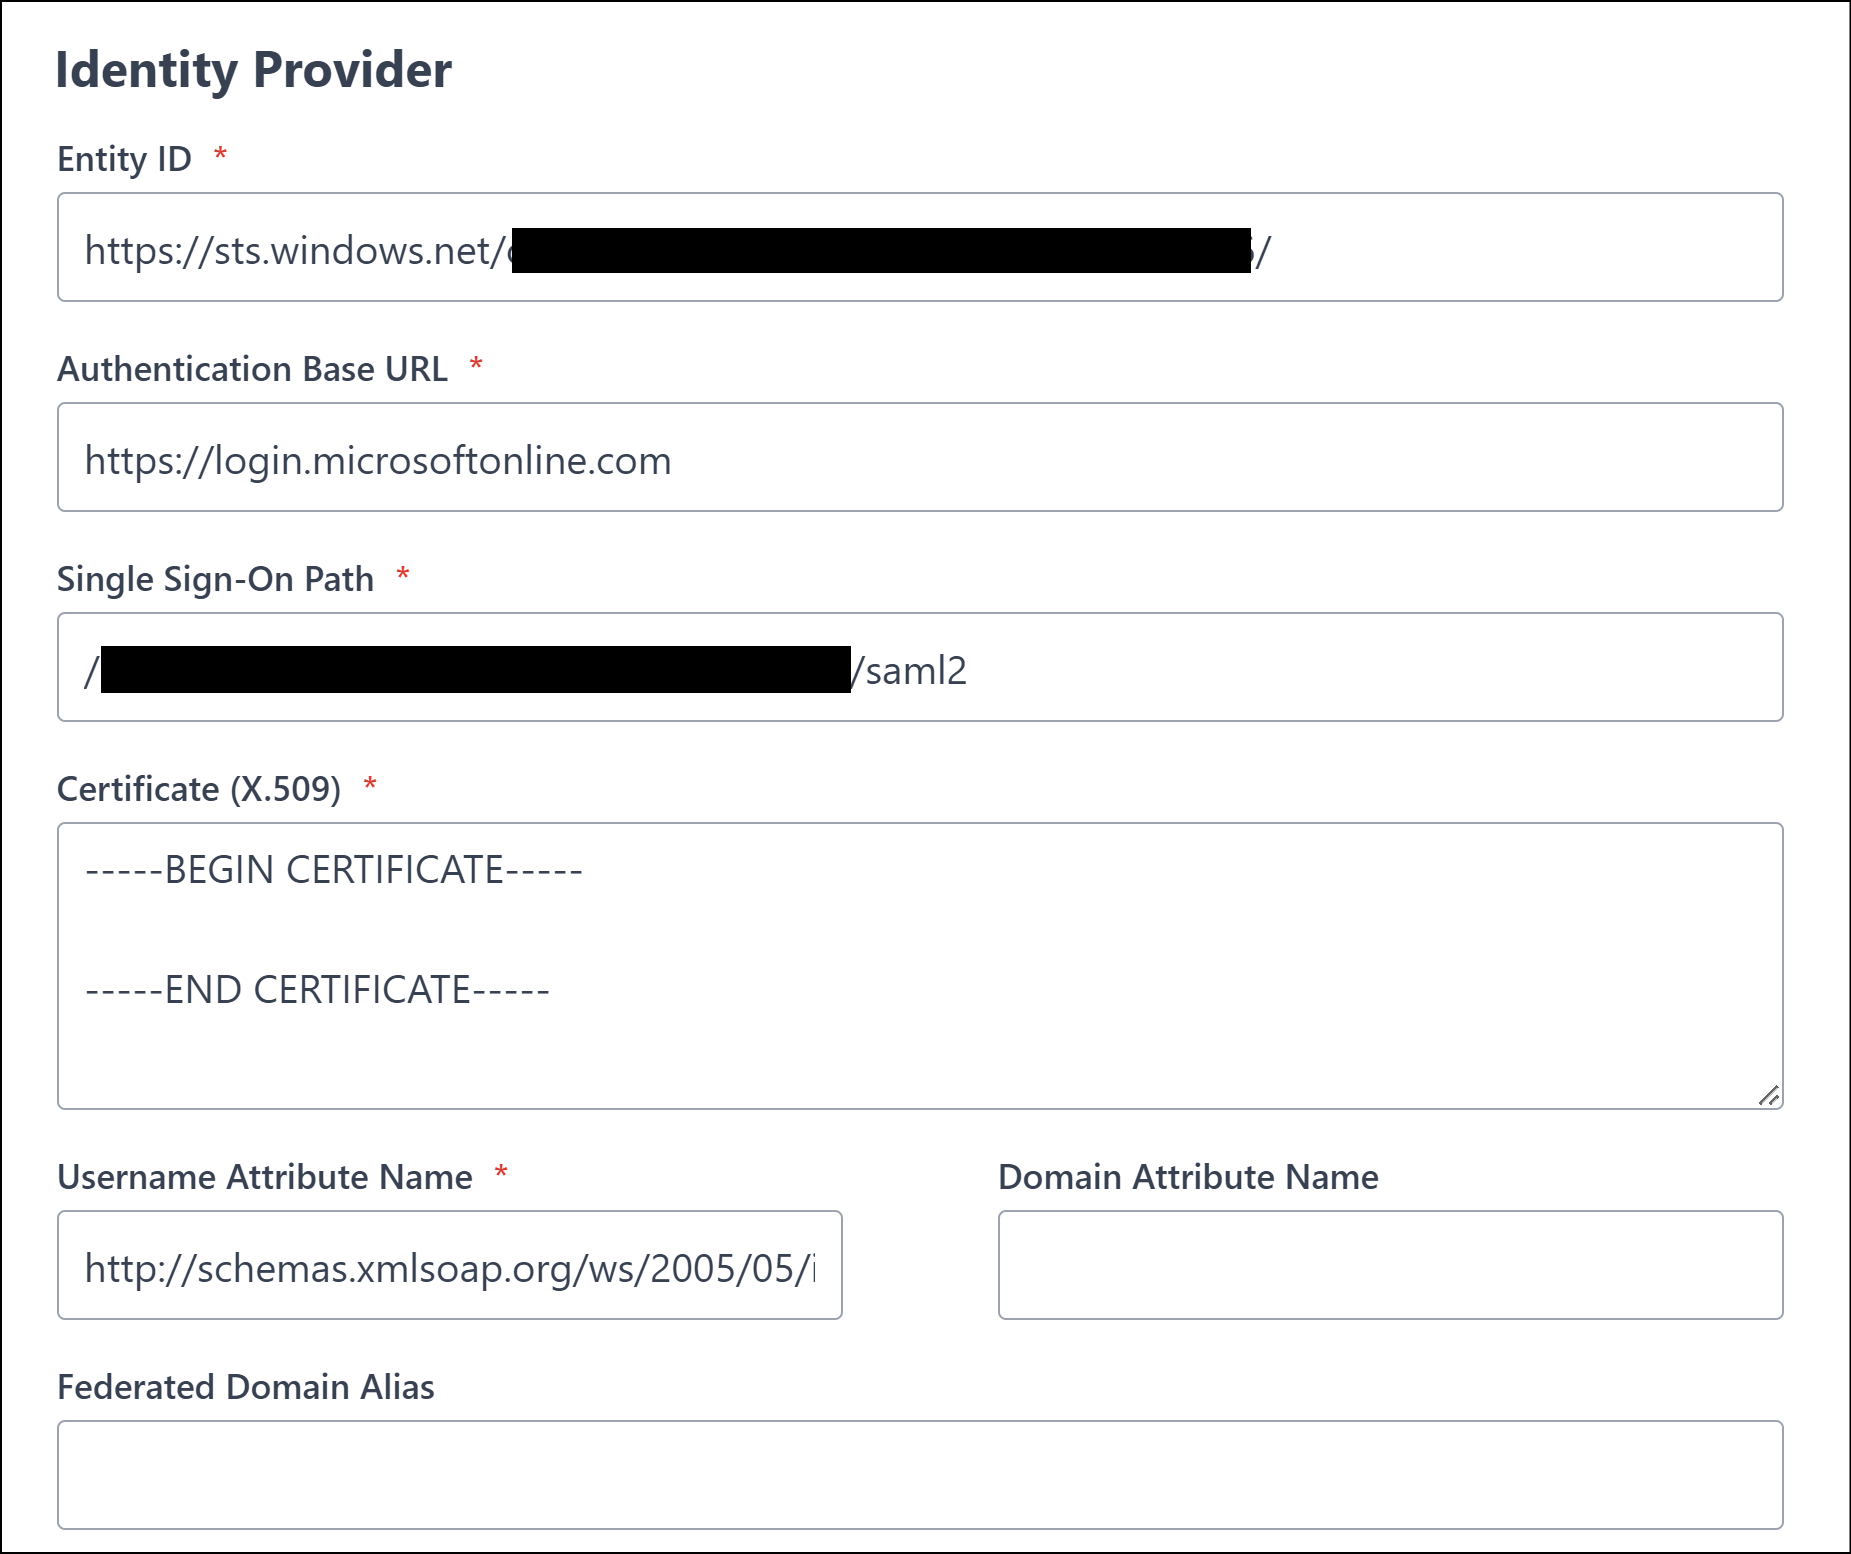
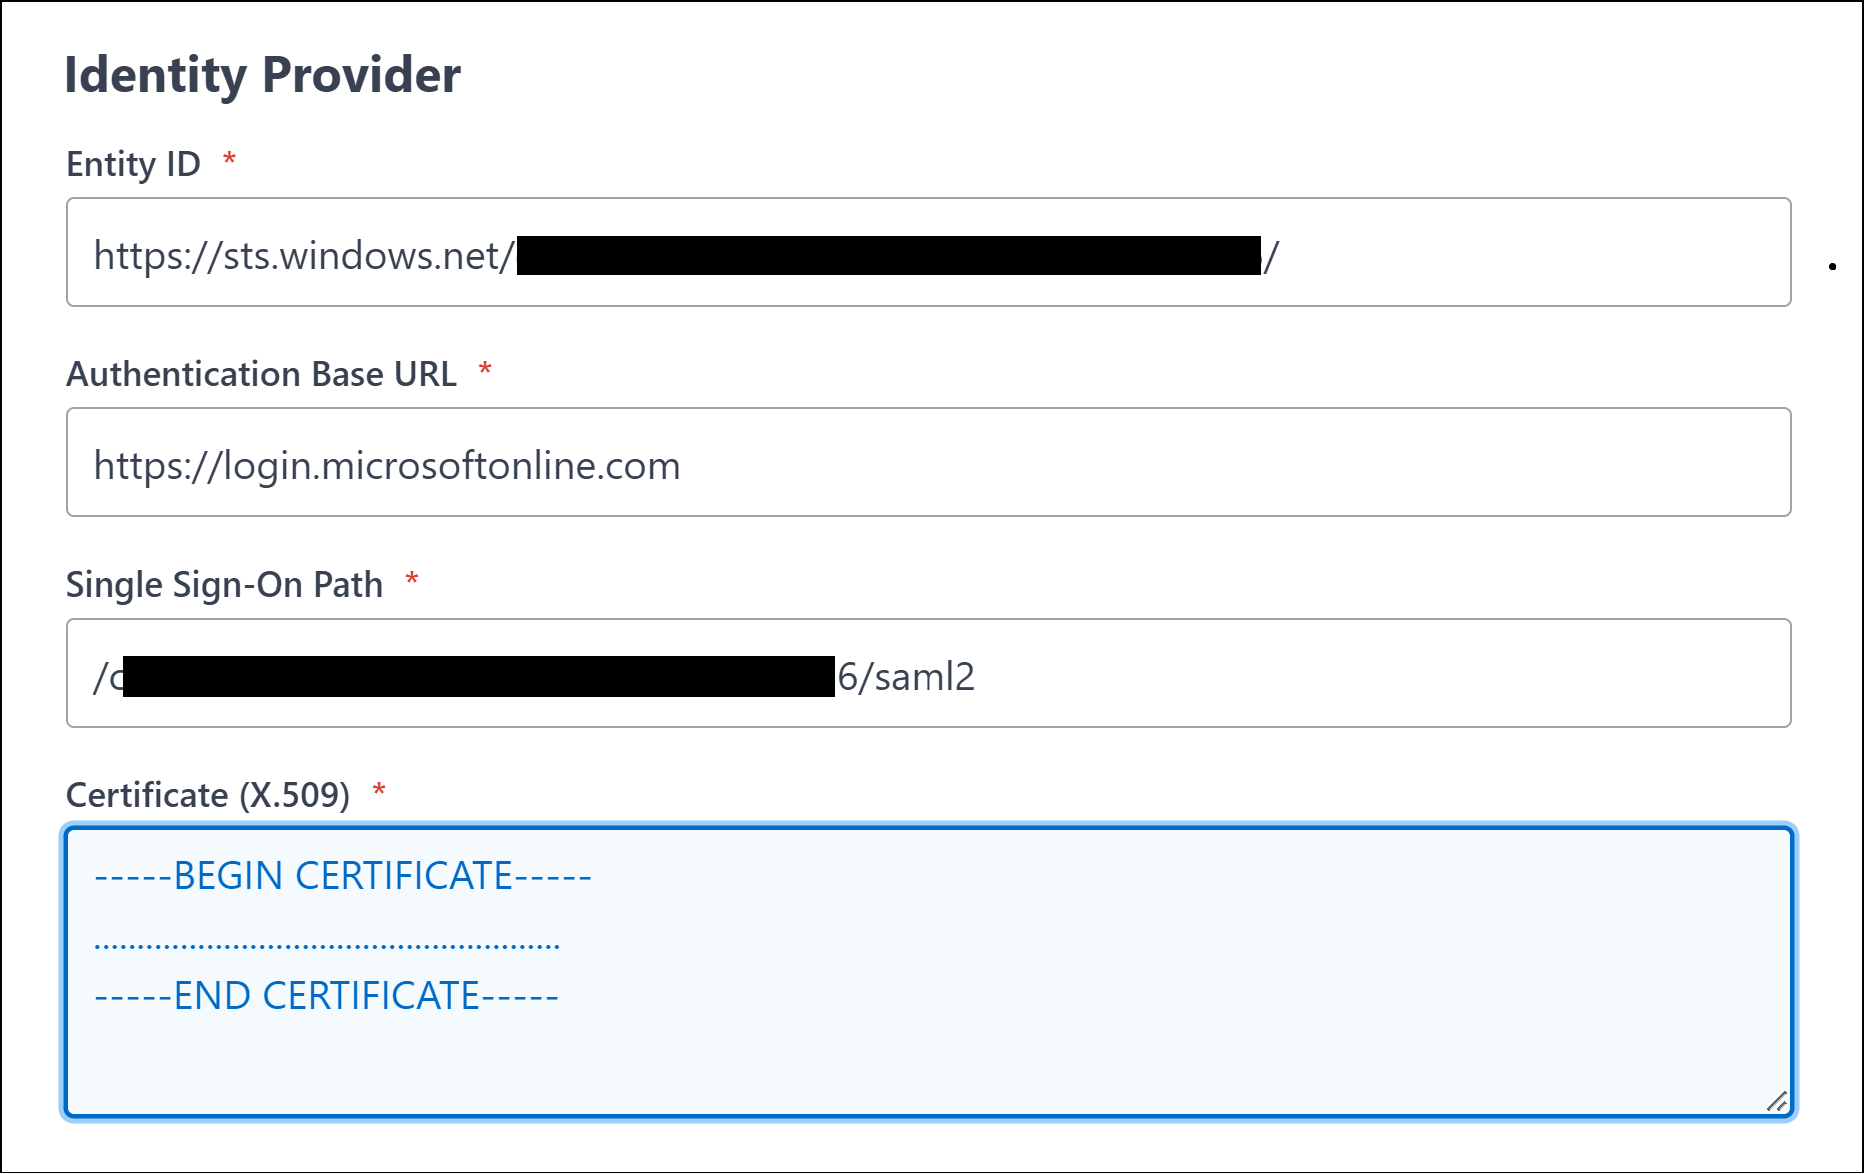
Scroll down to the Identity Provider section
Paste the Federation Metadata XML file content into the Importing MetaData field
Click Add MetaData to form button.
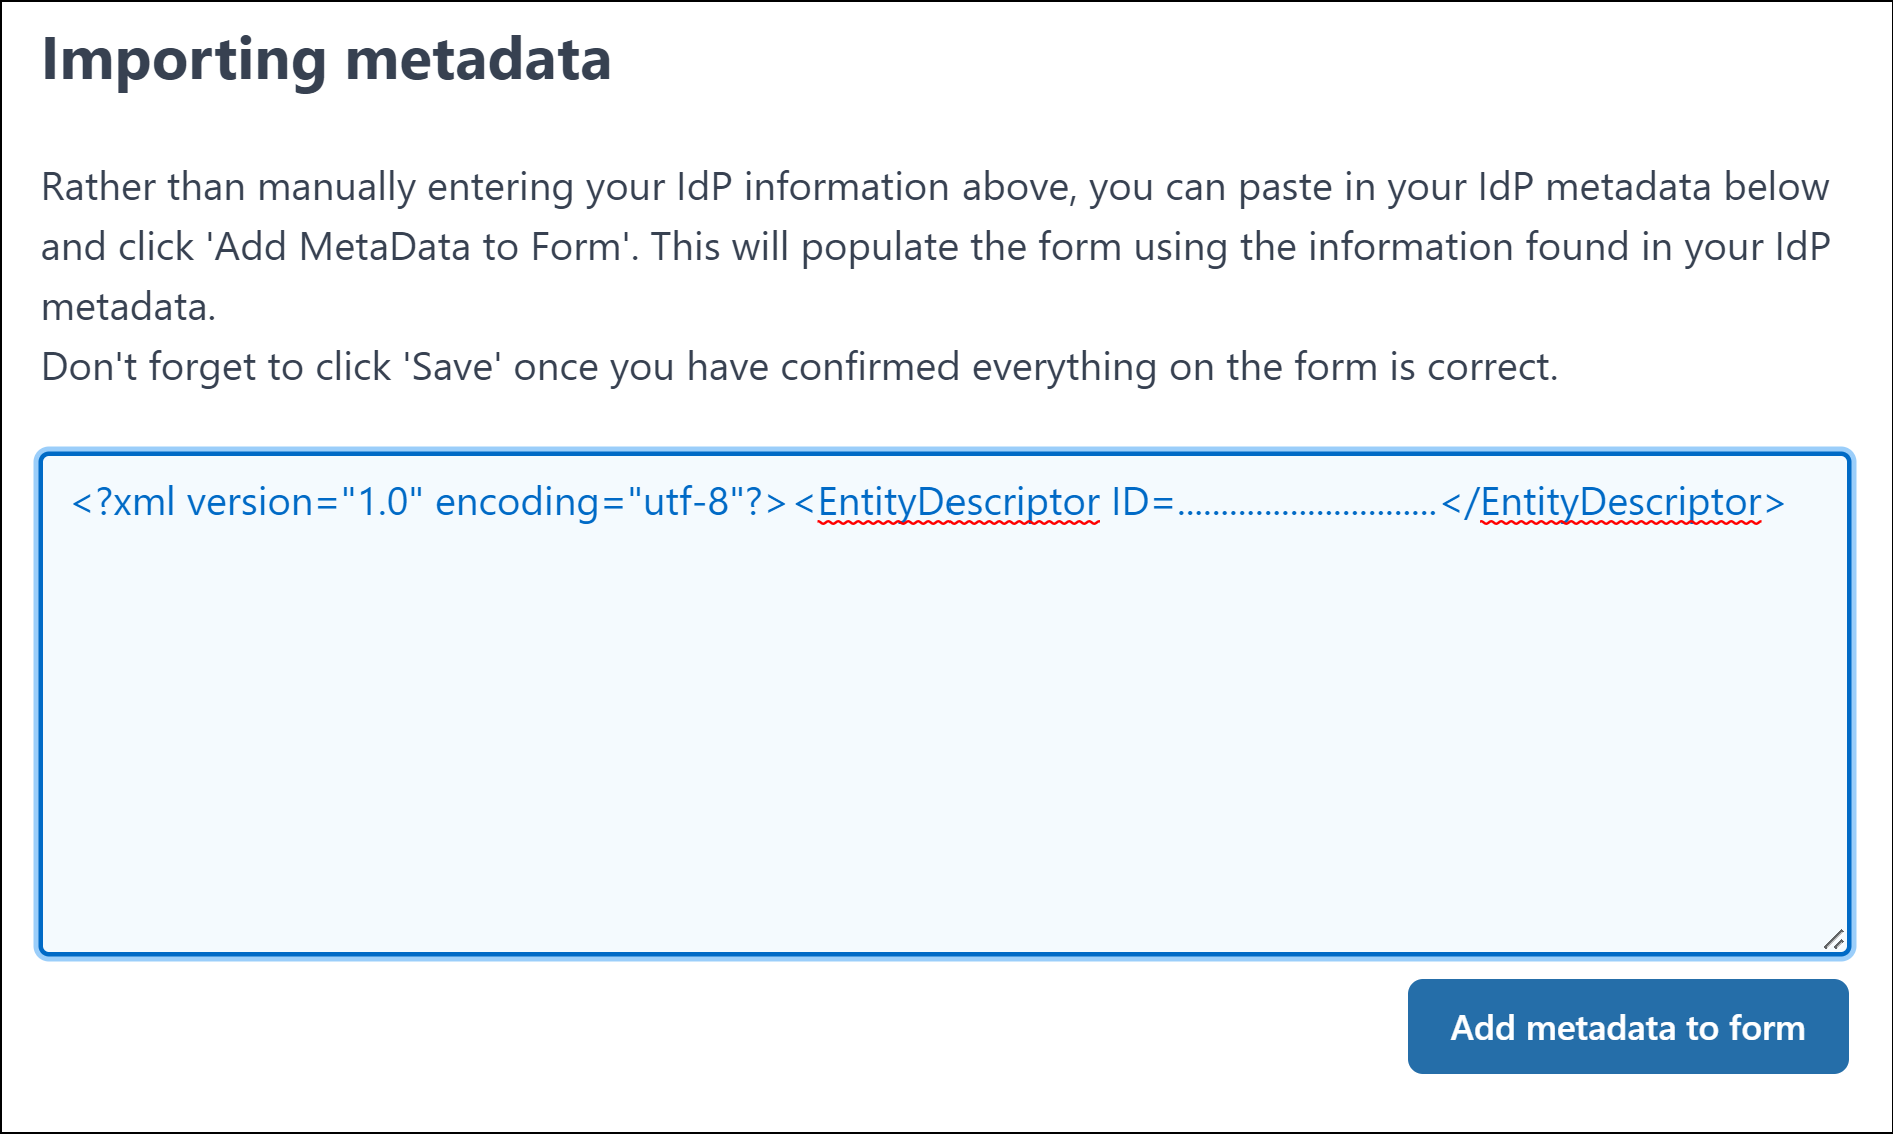
This process will populate the required values into the Identity Provider fields.
Select one of the the following sections based on the required AppsAnywhere configuration to continue.
The only missing item which must be added manually under the Identity Provider section is the Username Attribute Name value.
If you wish to use the default user.userprincipalname attribute, enter the value previously noted into the Username Attribute Name field.
e.g. http://schemas.xmlsoap.org/ws/2005/05/identity/claims/name
Other SAML attributes can be used if required, however details of this are outside the scope of this document. Please contact AppsAnywhere support for assistance.
Enter the remaining required information (see SAML 2.0 Common | Identity-Provider-Settings documentation for more information):
The Enabled? option must be selected in order to enable this new authentication mechanism.
The Show on Login Page? option can be enabled to ensure this authentication option is presented and available on the AppsAnywhere login dialog.
The Friendly Name option is the text label of the button displayed on the AppsAnywhere login page (if the Show on Login Page? options is enabled).
The URL Identifier option represents the unique URL part used for this authentication method, for example https://my.appsanywhere.com/sso/saml2/<URL Identifier>
The URL Identifier MUST match the value defined previously within the Azure Enterprise Application Reply URL (Assertion Consumer Service URL) value.
e.g. azure
The LDAP Connection(s) to authorize against list allows the selection of the available LDAP connection(s) which will be used to lookup the user's group membership to evaluate the defined provision(s).
The Icon list allows the selection of the icon for the button displayed on the AppsAnywhere login page.
The Expected Username Format field allows for the definition of the expected username format that AppsAnywhere will receive.
Due to the variety of formats the user's credentials may be returned in, you can control what is expected so that AppsAnywhere can handle each and every one.
Such a format can be created by combining up to three "substitution" values, each denoting a different bit of information, with additional literal characters.
The three most common formats are:
{%user%} e.g. alice123
{%short%}\\{%user%} e.g. DOMAIN\alice123
{%user%}@{%domain%} e.g. alice123@domain.com
If no expected username format is provided, the following format is assumed by default {%user%}. See Single Sign-On Settings | Username-and-Format-Examples for more details.

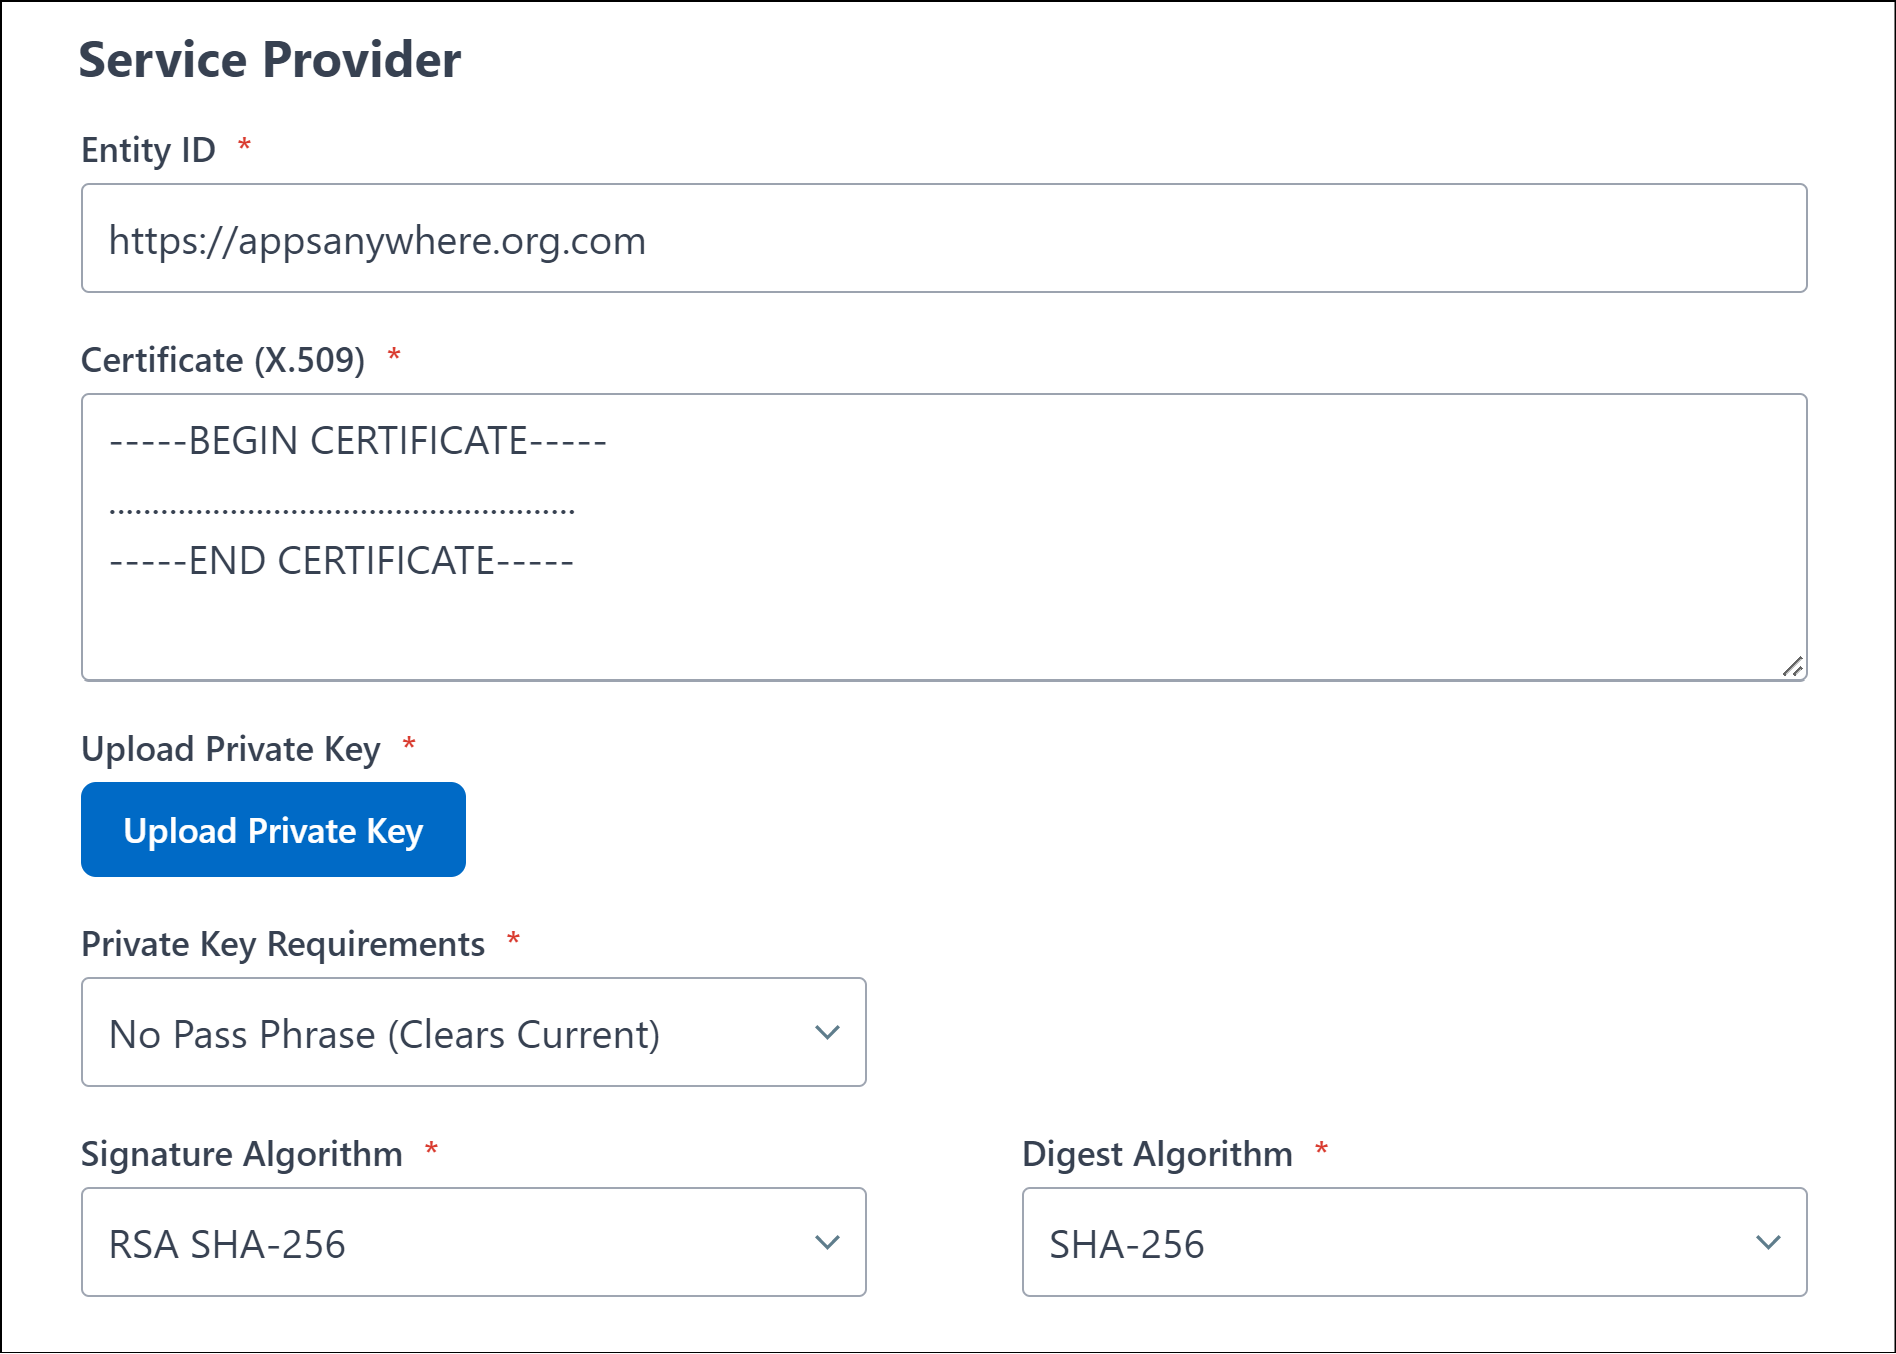
Under the Service Provider section the following fields need to be populated (see SAML 2.0 Common | Service-Provider-Settings documentation for more information):
The Entity ID value contains the AppsAnywhere base URL. This will be populated automatically and does not require modifications unless the default base URL is incorrect.
The Entity ID will default to your AppsAnywhere Service URL. If this value was changed when configuring the Enterprise Application with Azure, you must make sure this field value is updated to match.
The Certificate (X.509) field requires a valid X.509 certificate in base64 format. The certificate should be associated with the private key defined in the next step. The certificate is presented in the exported provider metadata as the certificate (with the private key) used by AppsAnywhere to sign SAML AuthnRequests.
This should begin and end with the -----BEGIN CERTIFICATE----- and -----END CERTIFICATE----- lines, respectively.
The certificate provided can be any valid SSL certificate. Self signed certificates can be used if preferred.
The Upload Private Key button allow for the upload of the private key associated with the certificate specified in the previous step.
The private key file must be in base64 format. The private key file should begin and end with the -----BEGIN CERTIFICATE----- and -----END CERTIFICATE----- lines, respectively.
The Private Key Requirements list allows a pass phrase to be specified if required by the private key.
The Signature Algorithm list allows for the selection of the required encryption level used by AppsAnywhere to encrypt the SAML assertion and response. The defined encryption level must be supported by the identity provider. Currently AppsAnywhere only supports RSA SHA-1 or later.
The Digest Algorithm list allows for the selection of the required algorithm used to produce the hash of the message contents, and used by the receiving side to verify the integrity of the sent data. The defined encryption level must be supported by the identity provider. Currently AppsAnywhere only supports RSA SHA-1 or later.
This section only applies to v2.12 and later with the SAML update applied.
Enter the remaining required information (see SAML 2.0 Common | Identity-Provider-Settings documentation for more information):
The Enabled? option must be selected in order to enable this new authentication mechanism.
The Show on Login Page? option can be enabled to ensure this authentication option is presented and available on the AppsAnywhere login dialog.
The Friendly Name option is the text label of the button displayed on the AppsAnywhere login page (if the Show on Login Page? options is enabled).
The URL Identifier option represents the unique URL part used for this authentication method, for example https://my.appsanywhere.com/sso/saml2/<URL Identifier>
The URL Identifier MUST match the value defined previously within the Azure Enterprise Application Reply URL (Assertion Consumer Service URL) value.
e.g. azure
The LDAP Connection(s) to authorize against field must NOT have any LDAP connections selected.
The Icon list allows the selection of the icon for the button displayed on the AppsAnywhere login page.
The Expected Username Format field allows for the definition of the expected username format that AppsAnywhere will receive.
Due to the variety of formats the user's credentials may be returned in, you can control what is expected so that AppsAnywhere can handle each and every one.
Such a format can be created by combining up to three "substitution" values, each denoting a different bit of information, with additional literal characters.
The three most common formats are:
{%user%} e.g. alice123
{%short%}\\{%user%} e.g. DOMAIN\alice123
{%user%}@{%domain%} e.g. alice123@domain.com
If no expected username format is provided, the following format is assumed by default {%user%}. See Single Sign-On Settings | Username-and-Format-Examples for more details.
Under the Service Provider section the following fields need to be populated (see Single Sign-On Settings | Username-and-Format-Examples documentation for more information):
The Entity ID value contains the AppsAnywhere base URL. This will be populated automatically and does not require modifications unless the default base URL is incorrect.
The Entity ID will default to your AppsAnywhere Service URL. If this value was changed when configuring the Enterprise Application with Azure, you must make sure this field value is updated to match.
The Certificate (X.509) field requires a valid X.509 certificate in base64 format. The certificate should be associated with the private key defined in the next step. The certificate is presented in the exported provider metadata as the certificate (with the private key) used by AppsAnywhere to sign SAML AuthnRequests.
This should begin and end with the -----BEGIN CERTIFICATE----- and -----END CERTIFICATE----- lines, respectively.
The certificate provided can be any valid SSL certificate. Self signed certificates can be used if preferred.
The Upload Private Key button allow for the upload of the private key associated with the certificate specified in the previous step.
The private key file must be in base64 format. The private key file should begin and end with the -----BEGIN CERTIFICATE----- and -----END CERTIFICATE----- lines, respectively.
The Private Key Requirements list allows a pass phrase to be specified if required by the private key.
The Signature Algorithm list allows for the selection of the required encryption level used by AppsAnywhere to encrypt the SAML assertion and response. The defined encryption level must be supported by the identity provider. Currently AppsAnywhere only supports RSA SHA-1 or later.
The Digest Algorithm list allows for the selection of the required algorithm used to produce the hash of the message contents, and used by the receiving side to verify the integrity of the sent data. The defined encryption level must be supported by the identity provider. Currently AppsAnywhere only supports RSA SHA-1 or later.
Under the Attribute Mappings section
There are additional values that need to be provided, in particular when using SAML only (without any LDAP connections). Full details regarding these fields can be found under the SAML Attribute Mapping section of the documentation.
The Domain Attribute and Short Domain Attribute fields are mandatory (when no LDAP connection is selected), however arbitrary values can be entered if you would like the system to use other fall back values.
For example the Domain Attribute field should contain the name of the SAML claim attribute which returns the fully qualified domain name the user in a member of. However it may not be possible or no attribute available provided by the IdP. If this is the case, AppsAnywhere will use the fully qualified domain name returned as part of the UPN (User Principal Name) attribute value.
For the Short Domain Attribute field, the additional Short Domain Fallback Value field can be used to provide a value that should be used if no information can be obtained.
If you are using native Microsoft AzureAD only and have NO on-premise/hybrid Windows Active Directory or do not use Azure Domain Services, the legacy short (NetBIOS) domain name is no longer used. Microsoft have previously used the short domain name AzureADto represent a AzureAD only cloud user account. In this case it is recommend that the Short Domain Fallback Value used is AzureAD.
In this example we use the arbitrary values domain.edu and domain for the Domain Attribute and Short Domain Attribute fields. In the Short Domain Fallback Value field we use AzureAD.
In the User Unique ID Attribute field, define the attribute which contains the user accounts unique immutable ID. In this example as we are using AzureAD, the http://schemas.microsoft.com/identity/claims/objectidentifier claim and attribute is included by default.
The Encoding field in this example should be left as the default None value. This is due to the AzureAD objectidentifier value (defined in the User Unique ID Attribute field) not being encoded.
The Username Attribute field must contain the SAML claim attribute you wish the system to use as the username identifier. In this example we specify the default http://schemas.xmlsoap.org/ws/2005/05/identity/claims/name attribute which returns the user’s UPN.
It is important that the previous Expected Username format field under the Identity Provider section contains the correct syntax of the return value for the Username Attribute attribute. In this example as we are using the user’s UPN value, the Expected Username format syntax should be {%user%}@{%domain%}.
The User Principal Name Attribute field must contain the SAML claim attribute you wish the system to use that contains the user’s UPN value. In this example, the default http://schemas.xmlsoap.org/ws/2005/05/identity/claims/name is used.
The User Display Name Attribute field must contain the SAML claim attribute which returns the user’s display name value. The creation of this claim attribute was performed during the AzureAD Enterprise Application configuration and displayname claim attribute name was used.
Once complete, enable and save the SSO method.
Please refer to the SAML 2.0 Common section of the documentation for any further information.