
Single Sign-On Settings
Overview
Single sign-on is a great addition when it comes to user experience as it means users don't have to go through the process of entering their login credentials to get access to the system and can add a layer of security with multi-factor authentication (MFA or 2FA).
AppsAnywhere supports a wide range of single sign-on (SSO) methods "out of the box":
Windows/Kerberos pass-through authentication (traditional on-premise SSO, not available with AppsAnywhere Cloud)
ADFS (OAuth 2.0 and SAML)
SAML 2.0 (Generic)
Azure AD (Office 365) (OAuth 2.0)
Shibboleth 2 (SAML)
Token
In addition to those listed above, any SSO method that can be handled by an Apache server module should also be compatible with the new SSO support.
Windows pass-through authentication is configured by default during your AppsAnywhere installation and when you get into viewing the configured SSO methods (below), you will see that this will have already been added and (mostly) configured for you.
Token-based SSO is available to cover all remaining scenarios as it can be used programmatically to integrate any custom applications you may have with AppsAnywhere. AppsAnywhere uses this feature, as an example, to allow direct login to AppsAnywhere once a user has registered for a demo account using our custom demo registration app.
The table below lists the available SSO implementations with a little description of how they work.
SSO Method | Description | Documentation Page |
|---|---|---|
SAML 2.0 (recommended for MFA/2FA) | SAML 2.0 is a much more common standard for transmitting authentication and authorization information between systems used across a wide range of identity systems. AppsAnywhere should be able to accept authentication information from any SAML 2.0 provider using the SAML 2.0 Custom SSO method but we have also implemented specific methods for Shibboleth and ADFS to reduce the amount of configuration you need to do in those cases. AppsAnywhere fully supports the use of Metadata for configuration, making this the easiest method to implement of those available. | |
OAuth 2.0 | OAuth 2.0 is a (somewhat un-standardized) standard for transmitting authentication and authorization information between systems. It is most frequently used among our customers with Azure AD or ADFS. OAuth implementations vary slightly so there is no generic option here but we will happily implement support for any method you are using if it isn't covered by the other options available. | |
Token | As mentioned in the overview, AppsAnywhere also provides a generic token-based identity integration point to allow organisations to integrate their own custom systems with the product. If you already have your own system for identifying your users that doesn't make use of an OAuth or SAML based identity system then you can link to AppsAnywhere using a system of secured tokens. An authorization token contains encrypted details about the authenticated user and is passed from your system to AppsAnywhere to initiate login on their behalf. | |
External Service | This method is intended for other integrations that can be built into AppsAnywhere that do not necessarily conform to any existing standards. The AppsAnywhere token method is one such example, which can be used in conjunction with this method to provide users with a link to the external service that will return the valid AppsAnywhere token and perform authentication on the user's behalf. |
Ensure a reminder is set for any SSL certificates used in SSO configuration
Viewing Configured SSO Methods
Navigate to the Single Sign-On Settings page:
Log into AppsAnywhere as an admin user
Cick on Return to Admin to access the AppsAnywhere admin portal
Hover over the settings menu (the cog icon found at the top right of the page)
Click on Single Sign-On Settings on the dropdown menu
Here you will see a full list of all of the SSO methods currently defined in AppsAnywhere, including the system-defined Windows pass-through method set up during installation.
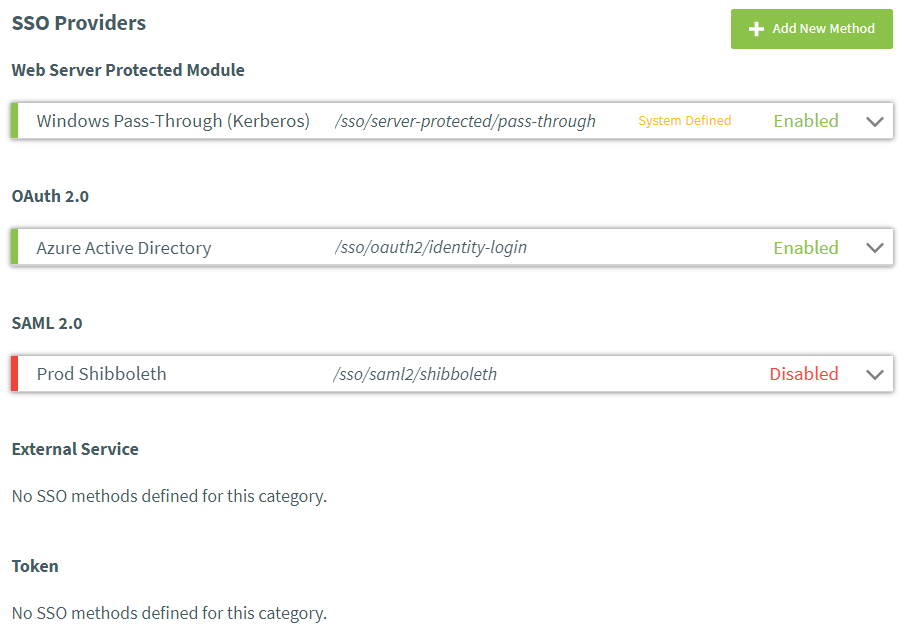
Each SSO method is listed as an expandable row under it's respective SSO category, as shown above. You can see the full details for each method by clicking on the row to expand it. Clicking the row header again will collapse the details pane, as will expanding any other SSO method.
Adding New SSO Methods
If you want to support a new type of single sign-on to AppsAnywhere, you will need to add a new SSO method:
Navigate to the Single Sign-On Settings page (described above)
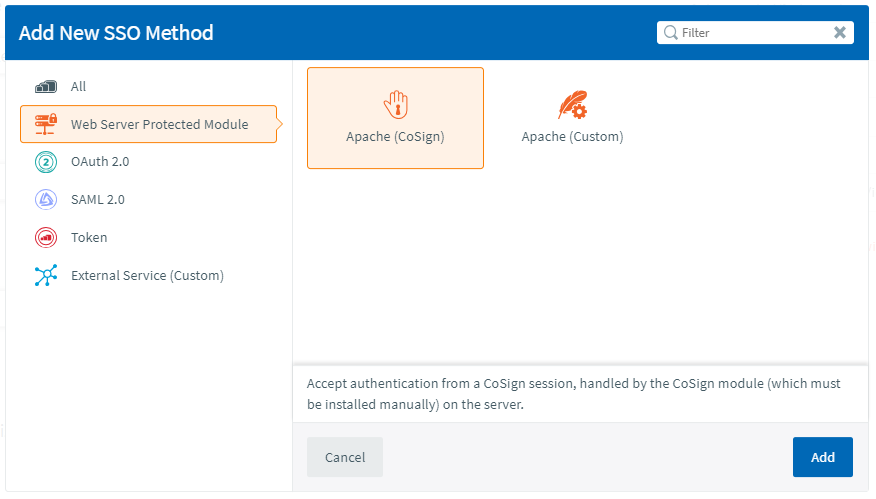
Click the Add New Method button in the top right corner
Choose the category of SSO method you want to add from the list on the left-hand side of the Add New SSO Method dialog
Select the type of SSO method you would like to add from that category
Confirm using the description from the bottom of the dialog that the selected SSO method is what you need
Click Add
A new expanded row will be added to the SSO methods list and the details form will be loaded, ready for you to complete:
Start by completing all of the fields common to all SSO methods, as described in the Common SSO Method Settings section later in this article
Enter all the required information specific to that particular type of delivery method, as described in the individual articles for each type
When you have confirmed you have entered all the required details, click Save
When you click the save button, you will see a notification that the SSO method was saved successfully

If there were any errors with the details you provided, these will be highlighted on the form and must be corrected before you can successfully save the form.
You may notice that the forms that you see when you add different SSO methods from the same category (such as SAML and OAuth) are all the same. This is simply because the variations between all of the methods in each category are actually very minor. The only differences between the individual methods in a category are the default values that we load into the forms to get you started.
Editing SSO Methods
Editing the details of an SSO method is very simple:
Navigate to the Single Sign-On Settings page
Expand the SSO method you wish to edit by clicking on the row
Make the required changes to the details in the form
Click Save
You will receive the same notification that the details have been saved as you did when you first created the SSO method
If people are using (or relying on) the SSO method you are editing, make sure you are confident in the changes you are making as any errors could severely impact your users' ability to access the system. If you are unsure, create a duplicate SSO method with the updated details and test it using its specific URL before making it available to users, or copying the details across to the original method.
Deleting SSO Methods
If you really need to delete an SSO method, then doing so is very simple. However, you should really consider disabling the method rather than deleting it completely, unless it was just added for testing purposes.
Navigate to the Single Sign-On Settings page
Expand the SSO method you wish to remove by clicking on the row
Click Delete (found at the bottom of the form)
Click Delete again in the confirmation dialog
Deleting an SSO method will remove all ability for users to log in using that method and cannot be reversed without manually re-creating the SSO method again from scratch. Only delete an SSO method if you are 100% sure it is not being used, or is no longer required. Otherwise, consider disabling the method first; if people start complaining, then it is being used!
The system-defined Windows Pass-Through Authentication SSO method cannot be deleted. If you really do not want to use this method, just disable it.
Common SSO Method Settings
The following fields appear on all SSO method categories.
Field Name | Description | Intended Value |
|---|---|---|
Enabled | This toggle button either enables or completely disables the method. The value is also indicated in textual form in the row summary. | SSO methods should only be enabled if they are properly configured and you are ok with user logging in with them |
Show On Login Page (excluding Token) | This toggle button determines whether or not the method should appear as an option to the user on the login page. If enabled, users will be able to choose to use that particular SSO method rather than entering their username and password to log in to AppsAnywhere. | If your users are likely to prefer a particular SSO method over logging into the system using their username and password, you should consider giving them the option to use it on the login page. |
Friendly Name | The friendly name serves two purposes; it helps you determine which SSO method is which in the list but it will also be used as the text displayed on the button on the login page if you selected Show On Login Page. | Choose a short name that succinctly describes the sign-on method (e.g. "MyIdentity" or "Office365") |
Icon (excluding Token) | The icon that will be presented to the user on the login page, if Show On Login Page is enabled. An icon can be selected from the pre-defined list, or a custom icon can be uploaded. | Choose an icon that will help users identify the particular SSO method quickly. |
URL Identifier | All SSO methods are available through their own specific URL. The start of this URL depends on the type of SSO method it is (e.g. oauth, or saml) but the latter part of the URL is customizable. The URL Identifier will be used as the last part of the URL for that SSO method For example: /sso/saml/uni | The value for the SSO method URL will likely be closely related to the friendly name you gave the method, but in a format compatible with a URL. |
LDAP Connection(s) to authorize against | As AppsAnywhere supports the addition of more than one LDAP connection, the SSO processor will need to know which domain to authorize the incoming request against. Select the LDAP connections from the list available to specify those applicable to the particular SSO method. If you select more than one LDAP connection, then you will need to provide the domain that the user is associated with as one of the returned attributes, or as part of the username (used in conjunction with expected username format), so that the system can determine which LDAP connection to use. When using SAML only (without an LDAP connection)
| Select each domain that users authenticating with this SSO method could be members of. |
Expected Username Format | Due to the variety of formats the user's credentials may be returned in, we allow you to control what is expected so that AppsAnywhere can handle each and every one. Such a format can be created by combining up to three "substitution" values, each denoting a different bit of information, with additional literal characters. See the information to the right to learn more about constructing a complete format. The three most common formats you will likely find yourself using are: "{%user%}", "{%short%}\\{%user%}" and "{%user%}@{%domain%}". Note that all of these will be without the double quotes. If no expected username format is provided, the following format is assumed by default (again, sans quotes): "{%user%}". See the table further below which provides examples of how different username values would be matched against the three most common formats. | There are three substitution values you may combine together to provide a complete format:
Note: the format, when not empty, must contain one {%user%} substitution value at the very least. The above substitution values can then be used in conjunction with other characters (that are taken literally) to create various formats, e.g. "{%user%}@{%domain%}". |
In addition to these fields, each SSO method has additional fields that you need to complete, depending on the type of SSO method it is.
See the specific documentation for the chosen SSO method to continue with the configuration:
Username and Format Examples
Username Format | Example Username Data | Matched Information |
|---|---|---|
{%user%} | alice123 | Username: alice123 Short Domain: N/A Full Domain: N/A |
APPSANYWHERE\alice123 | Username: APPSANYWHERE\alice123 Short Domain: N/A Full Domain: N/A | |
alice123@appsanywhere.com | Username: alice123@appsanywhere.com Short Domain: N/A Full Domain: N/A | |
{%short%}\\{%user%} | alice123 | Username: None Short Domain: None Full Domain: N/A |
APPSANYWHERE\alice123 | Username: alice123 Short Domain: APPSANYWHERE Full Domain: N/A | |
alice123@appsanywhere.com | Username: None Short Domain: None Full Domain: N/A | |
{%user%}@{%domain%} | alice123 | Username: None Short Domain: N/A Full Domain: None |
APPSANYWHERE\alice123 | Username: None Short Domain: N/A Full Domain: None | |
alice123@appsanywhere.com | Username: alice123 Short Domain: N/A Full Domain: appsanywhere.com |
When the expected format is "{%user%}" and the user's domain is not included in their login username, if there is only one LDAP connection selected for the method then this is used by default! This is also true when using UPN usernames with a federated alias for SAML 2.0 methods.
Configuring SSO Defaults
There are three global settings found on the right-hand side of the Single Sign-On Settings page.
These are:
Default SSO Method (for /sso URL)
The default SSO method that will be used when navigating to /ssoAction for Unauthenticated Users
Whether the user should be redirected to login or the single sign on URL.Action for Managed/Labs URL
The action that Managed Machines and Labs will take.
The managed and labs URLs are accessible via /managed and /labs respectively. These have identical functionality so choose whichever you prefer!
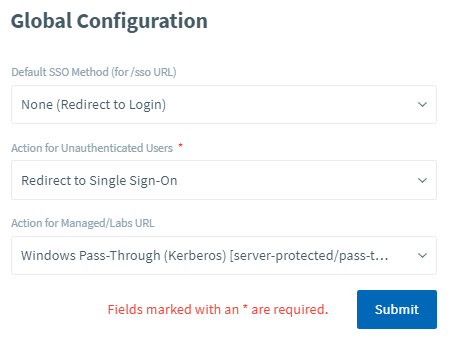
These settings determine how the system should handle authentication in each of the three scenarios and allow for a high level of customization relating to how you want the system to behave.
For each of the scenarios listed above, you can choose exactly which authentication action you want the system to take. You can choose whether to send the user to the login page (to choose their own authentication method), use the default SSO method or use a particular SSO method.
Example
As an example, let's assume you have two SSO methods available; Windows pass-through on managed machines and you use Azure AD (Office365) everywhere else. You may decide on the following authentication strategy:
If users go to /sso then they are directed straight to Office365 to authenticate
If users are accessing AppsAnywhere on a lab or managed machine then the desktop shortcut will take them to /labs or /managed which triggers Windows pass-through authentication to log them straight in
In all other scenarios, the user is directed to the login page to decide whether they want to login with Office365 or just enter their username and password
Testing
If you want to test your newly added single sign-on method without showing this to users or setting it to automatically redirect, you can enable the method but leave it hidden as shown below.
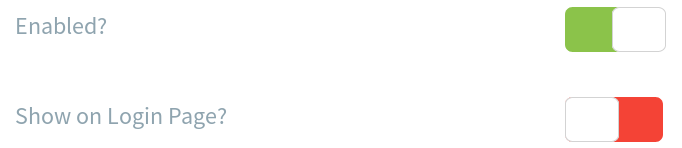
Once configured in this manner, the button will not be visible on the login page but you'll still be able to navigate to it directly!
The path that you'll need to navigate to can be found at the top of the SSO method, with the relevant part being the bit in the middle in italics.

In the example above, the path (and URL) you would need to navigate to in AppsAnywhere would be https://myappsanywhere.com/sso/server-protected/pass-through, replacing the domain as necessary.
Once you navigate to the chosen URL, the functionality you would expect to see will then be based on the type of SSO method that you added. The different processes can be found on the individual pages of each method.