
First-time Configuration
Overview
The AppsAnywhere appliance is provided in a secure offline state.
Before an AppsAnywhere engineer can remotely connect to the server(s) to complete the configuration and enable AppsAnywhere, the the steps on this article must be completed.
Additionally, you can also enter the information required to configure Single Sign-On, Proxy Server Settings, NTP Server Settings, System Update schedule and the PHP Locale. These steps are optional and can be completed by an AppsAnywhere engineer if preferred. Please see the relevant documentation in the Appliance Configuration Console (ACC) section for more information.
Login via the Console
Customer access to the appliance is only available via the hypervisor console (e.g. via vSphere or Hyper-V).
First open your hypervisor console for the AppsAnywhere appliance you want to configure.
Then login to the appliance using the default setup user account:
Username: setup
Password: s2aAh7fV9k
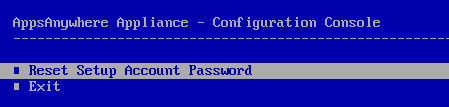
For your convenience we created the AppsAnywhere Appliance - Configuration Console (ACC) so you can easily configure your new server(s).
Reset Setup Account Password
The first time you login as the setup user you will be asked to reset the account password:
This password is automatically generated and will displayed in the output.
You must note the password before leaving this screen.
Failure to do so will require you to re-import the virtual appliance!
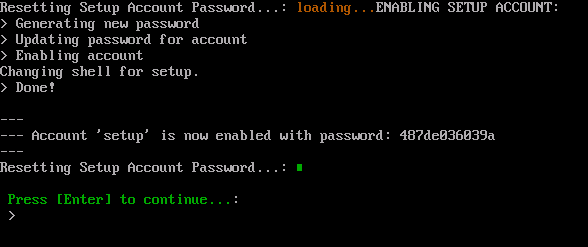
Once you have noted the password. Press Enter to return to the ACC.
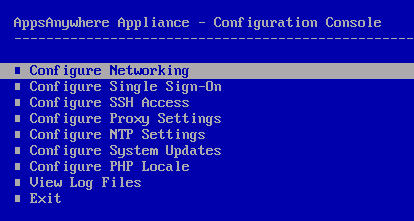
All ACC options are now available.
Configure Networking
Important: Azure/AWS Networking
This step should be skipped when deploying to Azure or AWS. The appliance images provided are pre-configured with DHCP enabled and networking configuration/IP address assignment is done entirely via the configuration options provided by the cloud provider.
The Configure Networking section of the AAC will allow you to Enable DHCP or to assign a static IP address to the appliance.
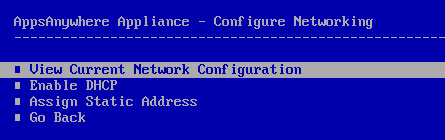
Choose the appropriate option for your preferred network configuration and follow the on-screen prompts.
Full details of how to use this menu are provided in the Appliance Configuration Console (ACC) documentation:
Once you have configured networking, choose View Current Network Configuration to confirm the IP address assigned to your AppsAnywhere server.
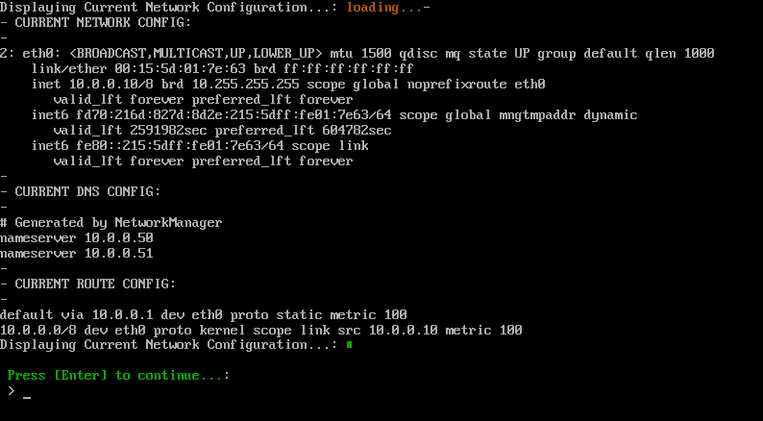
Please make a note of the assigned IP address.
Configure DNS
A fully qualified DNS name will need to be registered and assigned to the appliance prior to its configuration by the AppsAnywhere team.
Please create a DNS ‘A’ record containing the DNS name you wish to use. (e.g. appsanywhere01.uni.edu).
The appliance will use the assigned the hostname as advertised by your DNS servers.
Please see Connectivity Requirements for full details.
SSL Certificates
An SSL certificate issued by a trusted public certificate authority is required for AppsAnywhere, to secure access, and so that users accessing your app store on personal devices do not see security warnings in-browser.
It is the customer's responsibility to obtain and maintain up-to-date certificates.
Please see SSL Certificates for more information if new certificates are required.
Configure SSH Access
By default SSH access is disabled and blocked until configured, but access is required to complete AppsAnywhere configuration.
SSH access can be configured so that it is only permitted via a VPN connection, or via a Windows server which can act as a jump host.
It is recommended to configure the AppsAnywhere appliance to only accept SSH requests from the necessary IP addresses or IP ranges.
The Enable SSH for Specific IP Address or IP Range option allows you to specify an IP address or IP range that will be allowed access via SSH to the appliance.
You can add any combination of IP addresses and IP ranges, however currently this option only supports specifying one IP address or IP range at a time.
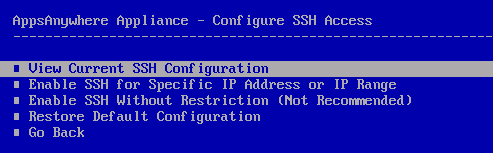
Whilst the appliance can be configured to enable SSH access without any IP restriction, this is not recommend for security reasons.
Full details of how to use this menu are provided in the Appliance Configuration Console (ACC) documentation:
Once you have configured SSH choose View Current SSH Configuration to confirm the active SSH firewall rules that have been defined.
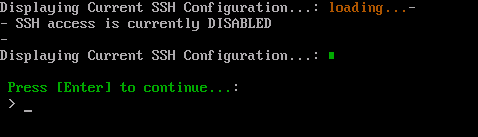
Please make a note of the enabled SSH rules to provide to the AppsAnywhere team along with your remote access details.
Configure System Updates
The AppsAnywhere Appliance by default will check for system and system component updates every month on the anniversary of its deployment and the update process will perform an automatic reboot of the appliance once complete.
A custom system update schedule should be defined by following the documentation:
Handover to an AppsAnywhere engineer
Congratulations, the initial configuration of the AppsAnywhere appliance is complete!
New Customers
Please add the required details to your Deployment Guide and return to an AppsAnywhere engineer as per the instructions in that document.
The IP address of your new server(s).
Details of how we can remotely access the new server(s) via SSH.
All other details as requested in the document.
Existing Customers
If you are adding a new server to your existing AppsAnywhere environment, please contact AppsAnywhere Support to provide the required details:
The IP address of the new server.
Details of how it can be remotely accessed via ssh.
Confirmation of whether this is a production or test server.
A support ticket will be created and a member of the team will connect to confirm when configuration can be completed.